Hi there! Welcome to the online transcript of Photography 1: Class 1.
To begin, this first lesson will be divided into two sections. In class, we spent the first half of the lesson on an introduction (an orientation) to the themes of this course, as well as a very thorough illustration of how we intend to approach photography here at ASOP.
The second half of the lesson was a basic primer on the essential functions of your camera: a sort of “Aperture/Shutter 101.”
I figured it might be easier if I divided this written account in a similar manner, and so I’ve given each topic its own page. This page here will cover the first half of the lesson, and then a link at the bottom will lead you to the second half.
Quick note: of the two, I actually believe this first part to be the more important section, because, while the “raw facts” about photography are going to be repeated over and over and over to you, it’s absolutely essential that you begin this course with the correct mental framework in terms of what you need to be prioritizing in these early stages of learning.
Enjoy!
Part 1
In order to understand the unique approach we take here at ASOP, I‘d like to begin this course with a quick examination of how most “professional” photographers learn their skills, along with an illustration of the kinds of behavior (and the kinds of images) their training often leads to.
But first, a couple of points of preface:
Number one, I realize that not all students here are interested in professional or commercial photography. Many of our students identify as artists, hobbyists, or documentarians. So it is important to note that I use the example of “professional” photography here only because, as a case study, it is so common and so familiar to most people (for instance, if one mentions the term “wedding photography,” it brings to mind certain kinds of images and certain kinds of aesthetics), and therefore it is a case study that is both easy to understand and easy to relate to.
But I want to clarify that this curriculum is not going to be slanted any more toward commercial photography than it is toward any other application of this medium.
Second, when we use the term “professional” photography at ASOP, we don’t especially mean to use it as a superlative, the way that the general public often does.
In other words, when the average person says something like “your images look so professional!” they’re obviously paying you a compliment. They’re saying they think your images are “good.”
But that isn’t QUITE what we’ll mean whenever we use the term here in our classes.
For us, “professional” photography will refer to a CATEGORY of photography - one in which the shooters are practically beholden to pre-established, already-proven, reliable methodology.
In other words, “professional” photographers almost never take any unknown risks when shooting, and they rarely experiment.
Because they almost can’t.
For instance, if you’re a professional photographer, and you have only 10 minutes to capture your client’s wedding vows…..you tend not to choose that moment to say “Hey, you know what, let’s try something totally new and see if it works!!”
You’re pretty much OBLIGATED not to do that. You owe it to your client NOT to do that.
For comparison, artists and hobbyists have the freedom or luxury of trying something totally new if they want, or even something totally non-sensical, just as an experiment. And even if a lot of that experimentation outright fails, or leads to dead ends…every once in a while, it can pay off in totally unexpected ways.
And that often means that most new photographic methods tend to be developed by artists and hobbyists, who have the freedom to be able to take those kinds of risks.
Whereas the professional photography community tends to wait until certain methods have been “proven” first, before they eventually adopt those methods.
So again, for our purposes the term “professional photography” will basically be a code word for “a category of photographers who depend almost entirely on reliable, well-tested methodology.”
And as such, they often rely on a lot of “formulas.“
But I’d also like to note that there’s no judgement on any of this, I just want to clarify that this is what we’ll mean whenever we use the term “professional photography.”
Ok, so in order to understand the specific approach we’ll be taking here at ASOP, let’s begin by taking a closer look at the category of “professional photography,” and let’s more specifically begin by breaking that category into two different tiers: a lower tier of professional photography, and an upper tier of professional photography.
So what’s the difference?
Well, the lower tier of the industry is what we’ll call the “going rate” photographer. It’s the 90% of professional photographers out there who possess nearly identical portfolios to their competitors.
For instance, if you google the words “engagement photographer,” or “family portrait photographer,” or “food photographer,” most of the portfolios and websites you’ll find will exhibit more or less the same kinds of images.
However, counter to that, there’s also a proverbial “top 10%” of the industry. Which would be the more elite photographers who tend to earn quite a bit more income, snag much higher-end clients, and who tend to be in much higher demand.
And a lot of our general public assumes that these photographers simply have more talent, or that they simply have a “better eye.”
But we’re going to understand the difference between these two tiers of photographers in far more practical terms than that.
We want to look primarily at how they’ve been taught to understand this medium, and then the approach they take in capturing their images (their shooting process).
So let’s begin by examining that the lower tier — ie: the “typical” professional photographer. These would be photographers who are mostly in line with the “going rate” of their industry.
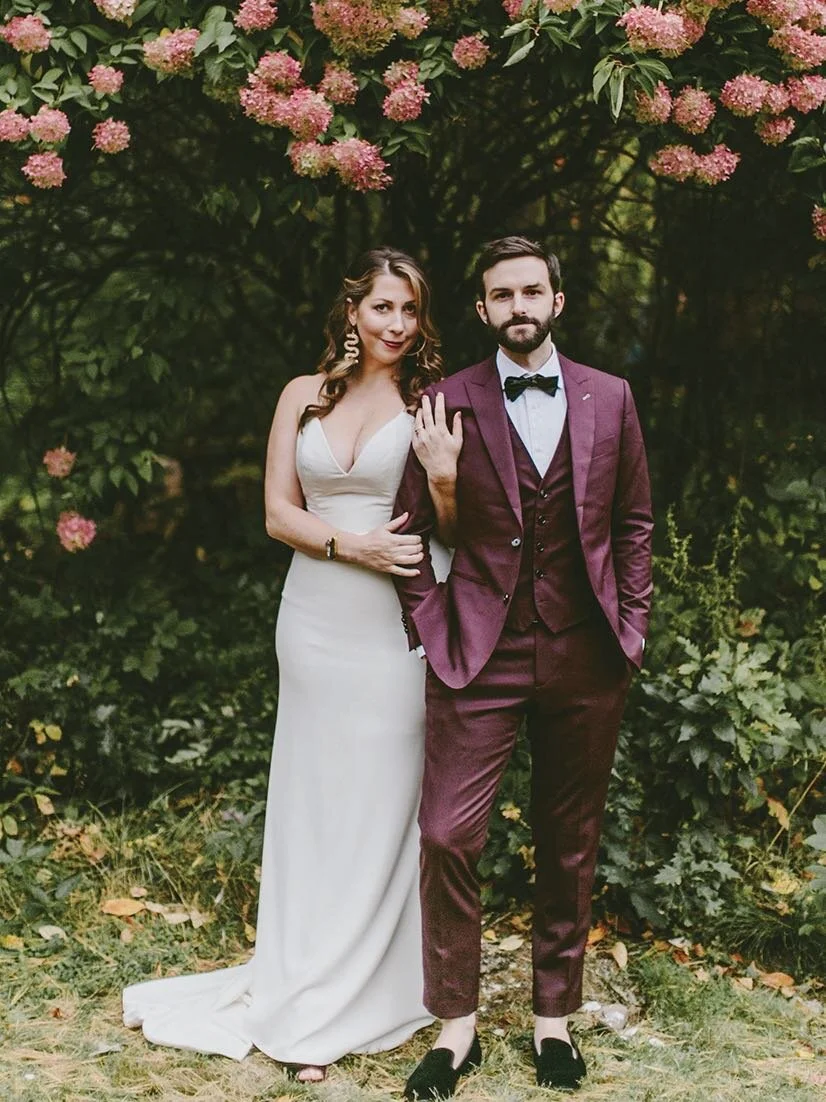
Let’s start with typical wedding photography:
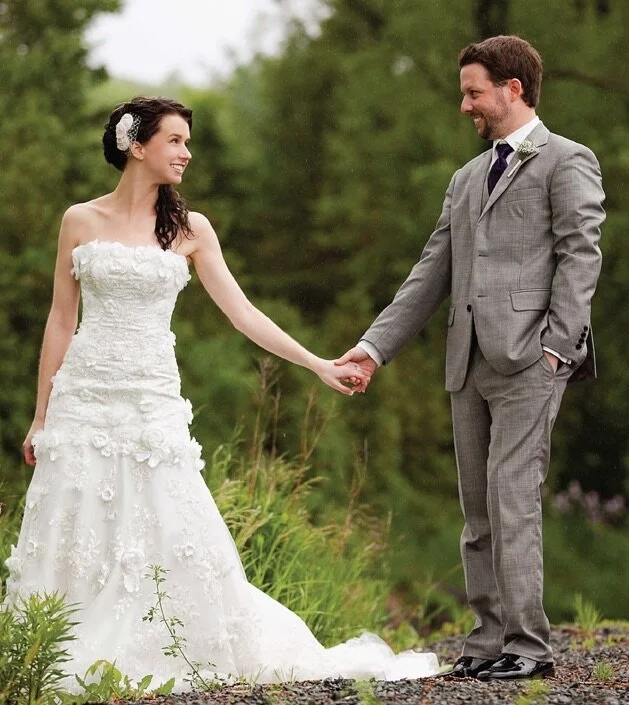
This kind of image is very common to the wedding industry. In fact, if you have wedding pictures of your own, they very likely resemble this one here.
But the first thing I need you to notice about this picture is that it has practically no physical variables in it.
What do I mean by that?
Well, if you look closely, there is no great difference in LIGHT within the scene (it’s not as though half the scene is in dark shadows while the other half of the scene is in bright highlights — everything is relatively evenly lit).
The image is also fairly flat, which is to say that there aren’t vastly different layers of space. Or another way to put it is that it isn’t as though relevant parts of the scene have been positioned at different distances to the camera — instead all relevant parts of the scene are on the same layer of space.
Also note that nothing in the scene is moving or changing.
Etc.
This is what we mean by “no major physical variables.”
Ok, so once that’s been established, the next thing that has to be established here is that that’s very much by design, which is to say that these photographers were specifically taught to rid the scene of any such variables.
Why?
Well the reason they were taught to do this is because the PRECEDING step in their education was to learn all the advanced functions and “features” of their camera.
In other words, this photographer most likely learned their skills through a series of professional workshops and tutorials, wherein all of the “features” of their camera were thoroughly explained to them…..and then they learned how they’re expected to use those “features” in their professional work.
But here’s the thing about all modern “camera features.” The fact of the matter is that the actual physics involved in how photography works haven’t changed one iota in the past 200 years. And the internal mechanics (ie: the internal mechanisms inside your equipment) have barely changed at all in the past 100 years.
What’s changed is that, on top of those internal mechanics, camera companies have built up a lot of technologies (a lot of abstract, proprietary “solutions”) that they’ve built into your camera’s operating system.
And every last one of those solutions has been PROGRAMMED into your camera, in order to respond to your scene in one pre-determined way as opposed to another.
But the problem with any kind of predetermined camera programming is that any unexpected variable in your scene might confuse that programming. And if that programming — if those algorithms — get confused, you’ll end up with unpredictable and unreliable results.
For instance, if there are different kinds of light in your shot, the camera has to GUESS which amount of light you wanted to expose. If there are different layers of space within your shot, the camera has to guess which one you wanted in focus, and to what degree you want other planes of space to be out of focus.
And the camera isn’t a mind reader, and it will therefore guess wrong most of the time.
So these photographers were taught to rid their scenes of those kinds of variables altogether, so that their camera’s algorithms won’t become confused.
They were taught that if they stage their scene as a “one size fits all” kind of scene, then the camera won’t have to guess or read your mind, since there will be only one rational way to take the picture,
And I need to point out that most of these photographers weren’t taught this logic OVERTLY. It’s more sort of baked into the “common wisdom” and advice that most photographers tend to receive. For instance, if you’ve ever heard things like “You should never shoot at noon, instead you should always shoot at the golden hour,” or if you’ve ever attended a portrait seminar and they told you to “take your subject into the shade to ensure perfectly even lighting.” Well, they’re basically trying to ensure there are no confusing variables in the scene.
But here’s the thing. Having variables in your shot is actually endlessly beneficial, because those variables are what ALLOW YOU TO MAKE ALTERATIONS TO YOUR IMAGE.
In other words, those variables give you choices, because each variable in your scene can be dealt with in different kinds of ways. And if each variable is offering you a CHOICE, then it means it’s opening up new pathways, or new directions you take your image.
And all of this gives you a lot of opportunity as a photographer to DIFFERENTIATE your image from how someone else might have shot it. To give your image a more unique expression.
But if you rid your shot of all physical variables, you have no such choices to make.
It means that all of your images are going to have to be structured in pretty much the same way.
And so, for these professionals, the problem becomes that if you can’t do anything to differentiate your images, or to RE-STRUCTURE your images (ie: if you can’t stand out on your actual photographic skills), then you have to find another way to compete, another way to stand out amongst your colleagues, and that usually means competing with non-photographic skills.
So, for instance, perhaps you take a class on how to “pose” your clients:
But note that this image has been structured the same way as the last one: It’s flat, it’s evenly lit, and nothing’s moving.
In other words, they’ve changed the subject matter ONLY…they haven’t changed anything about the PHOTOGRAPHY
Or maybe another non-photographic skill that photographers come to depend on is location scouting. So they learn how to find the right bridge, or the right field of flowers, or the right gazebo:

But once again, this image has the same structure as the first two. Flat, evenly lit, and nothing’s moving.
Again, we’ve altered the subject matter only, but not the actual photography.
The actual photography is always the same - which is to say all of these pictures have been SHOT the same way.
And the thing is, most people won’t likely notice that these images are all structured the same way, because most people are so distracted by the subject matter itself (ie: they see that it’s literally a different couple in the shot, or that it’s literally a different location), so they don’t really notice that the photography part is always the same.
But again, as I mentioned at the top, these are all “going rate” photographers. And in my experience they comprise about 90% of the profession.
But as noted before, there is an upper tier of professional photographers. A proverbial “top 10%.”
For instance, wedding photographers who charge $12K instead of $5K, and who you might often have to book several years in advance.
And their images don’t look like these..
So what do their images look like?
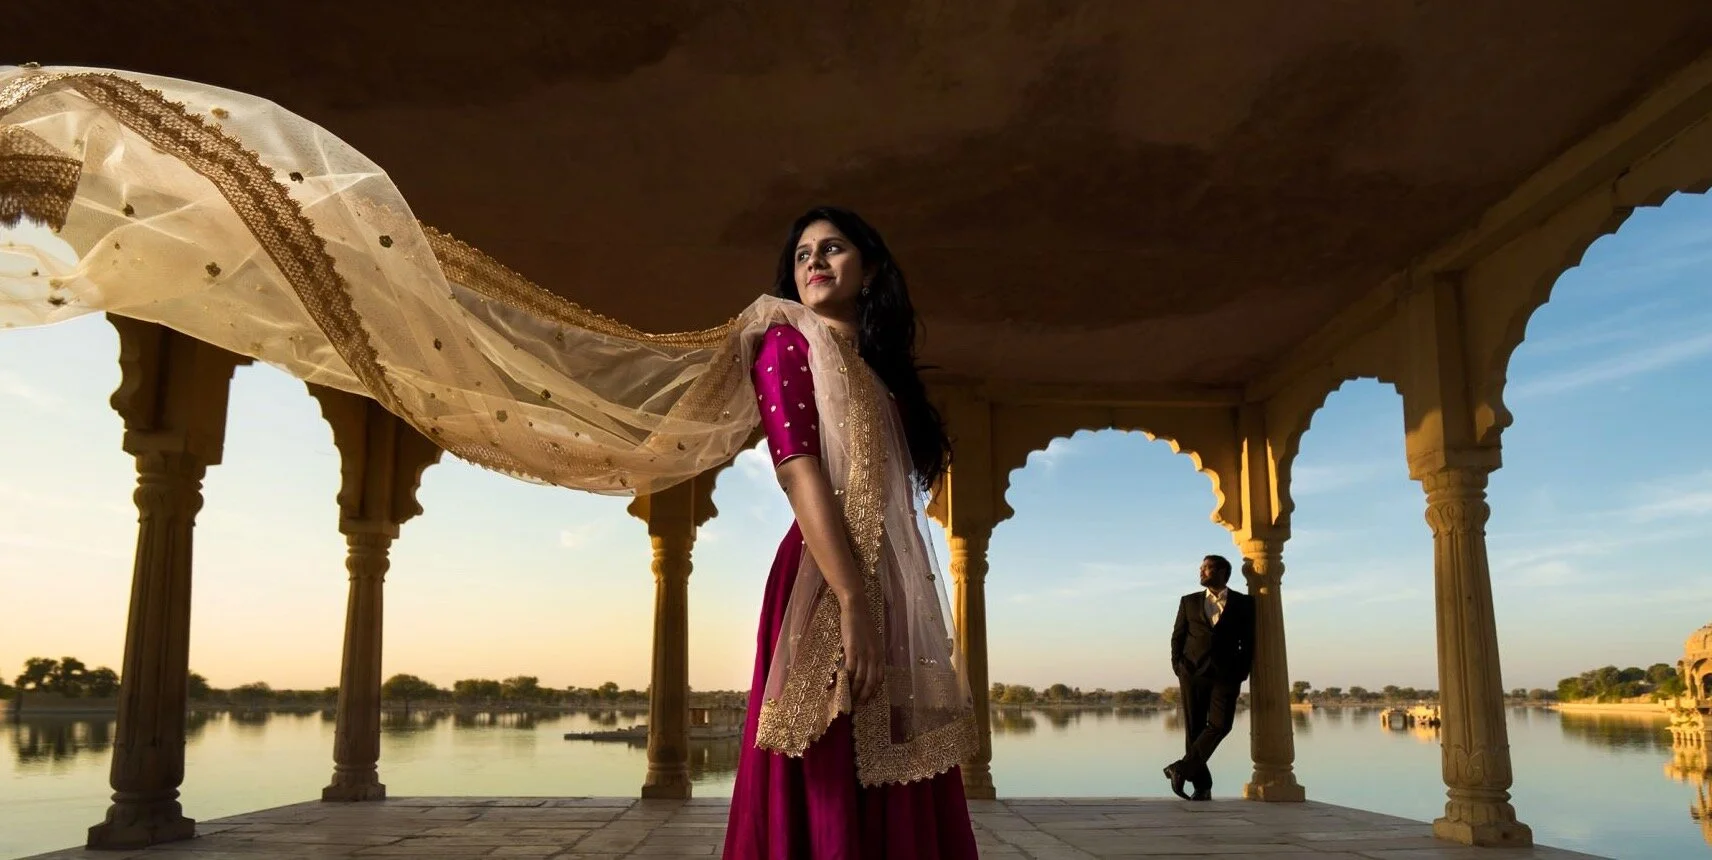
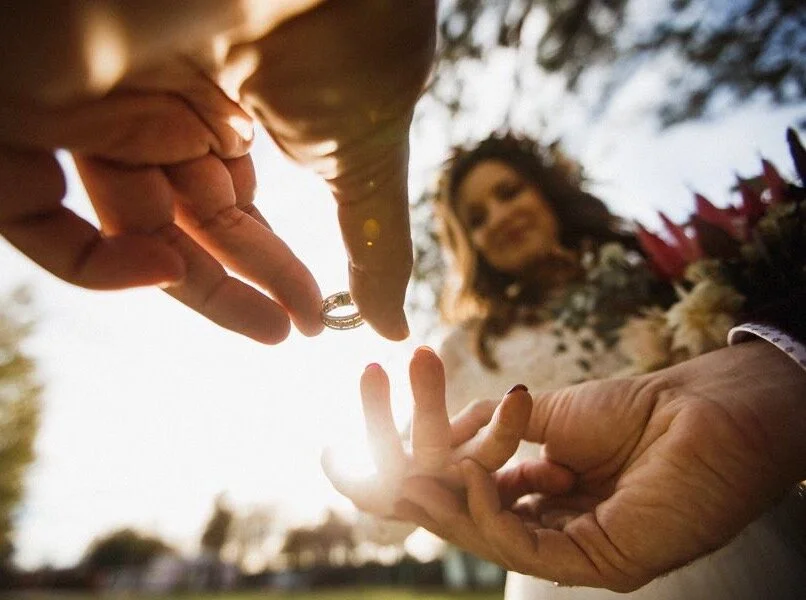
Well, let’s begin with an image that I should say isn’t PARTICULARLY sophisticated…but it’s going to be a very good jumping off point for our discussion:
Here you have a photographer exploiting a LIGHT differential in their shot.
In other words, this photographer is not afraid that the difference in light will confuse their algorithms, instead they’re happy to EXPLOIT that property of their scene, because they know that this light differential is really useful and valuable to them.
And in this particular case, the value here is that this light differential allows the photographer to invoke what you might call a “sentimental archetype.”
In other words, in our culture, we have a very strong association with “glowing backlight” as representing heavenliness, or spirituality, or sentimentality. And so this photographer is referencing this particular bride against that general association of sentimentality.
But I mentioned that this image isn’t particularly sophisticated, and the reason I say that is because this image is what we at ASOP call a “one-dimensional” image, which is to say the photographer here is using only 1 differential.
They’re using light…and that’s all.
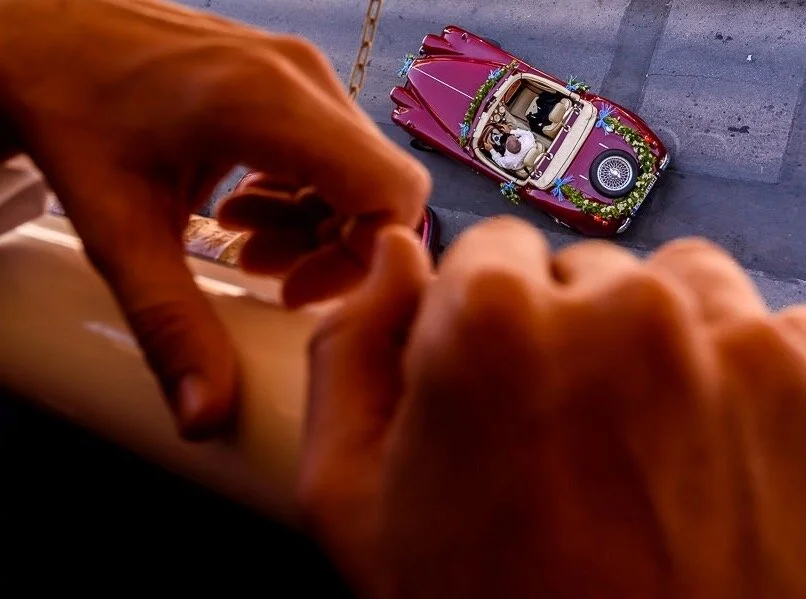
So with that in mind, let’s look at another “1-dimensional” image.
This time the photographer is taking advantage of a spatial variable (ie: different layers of SPACE). Something important in the shot is nearer to the lens, and another important part of the shot is farther.
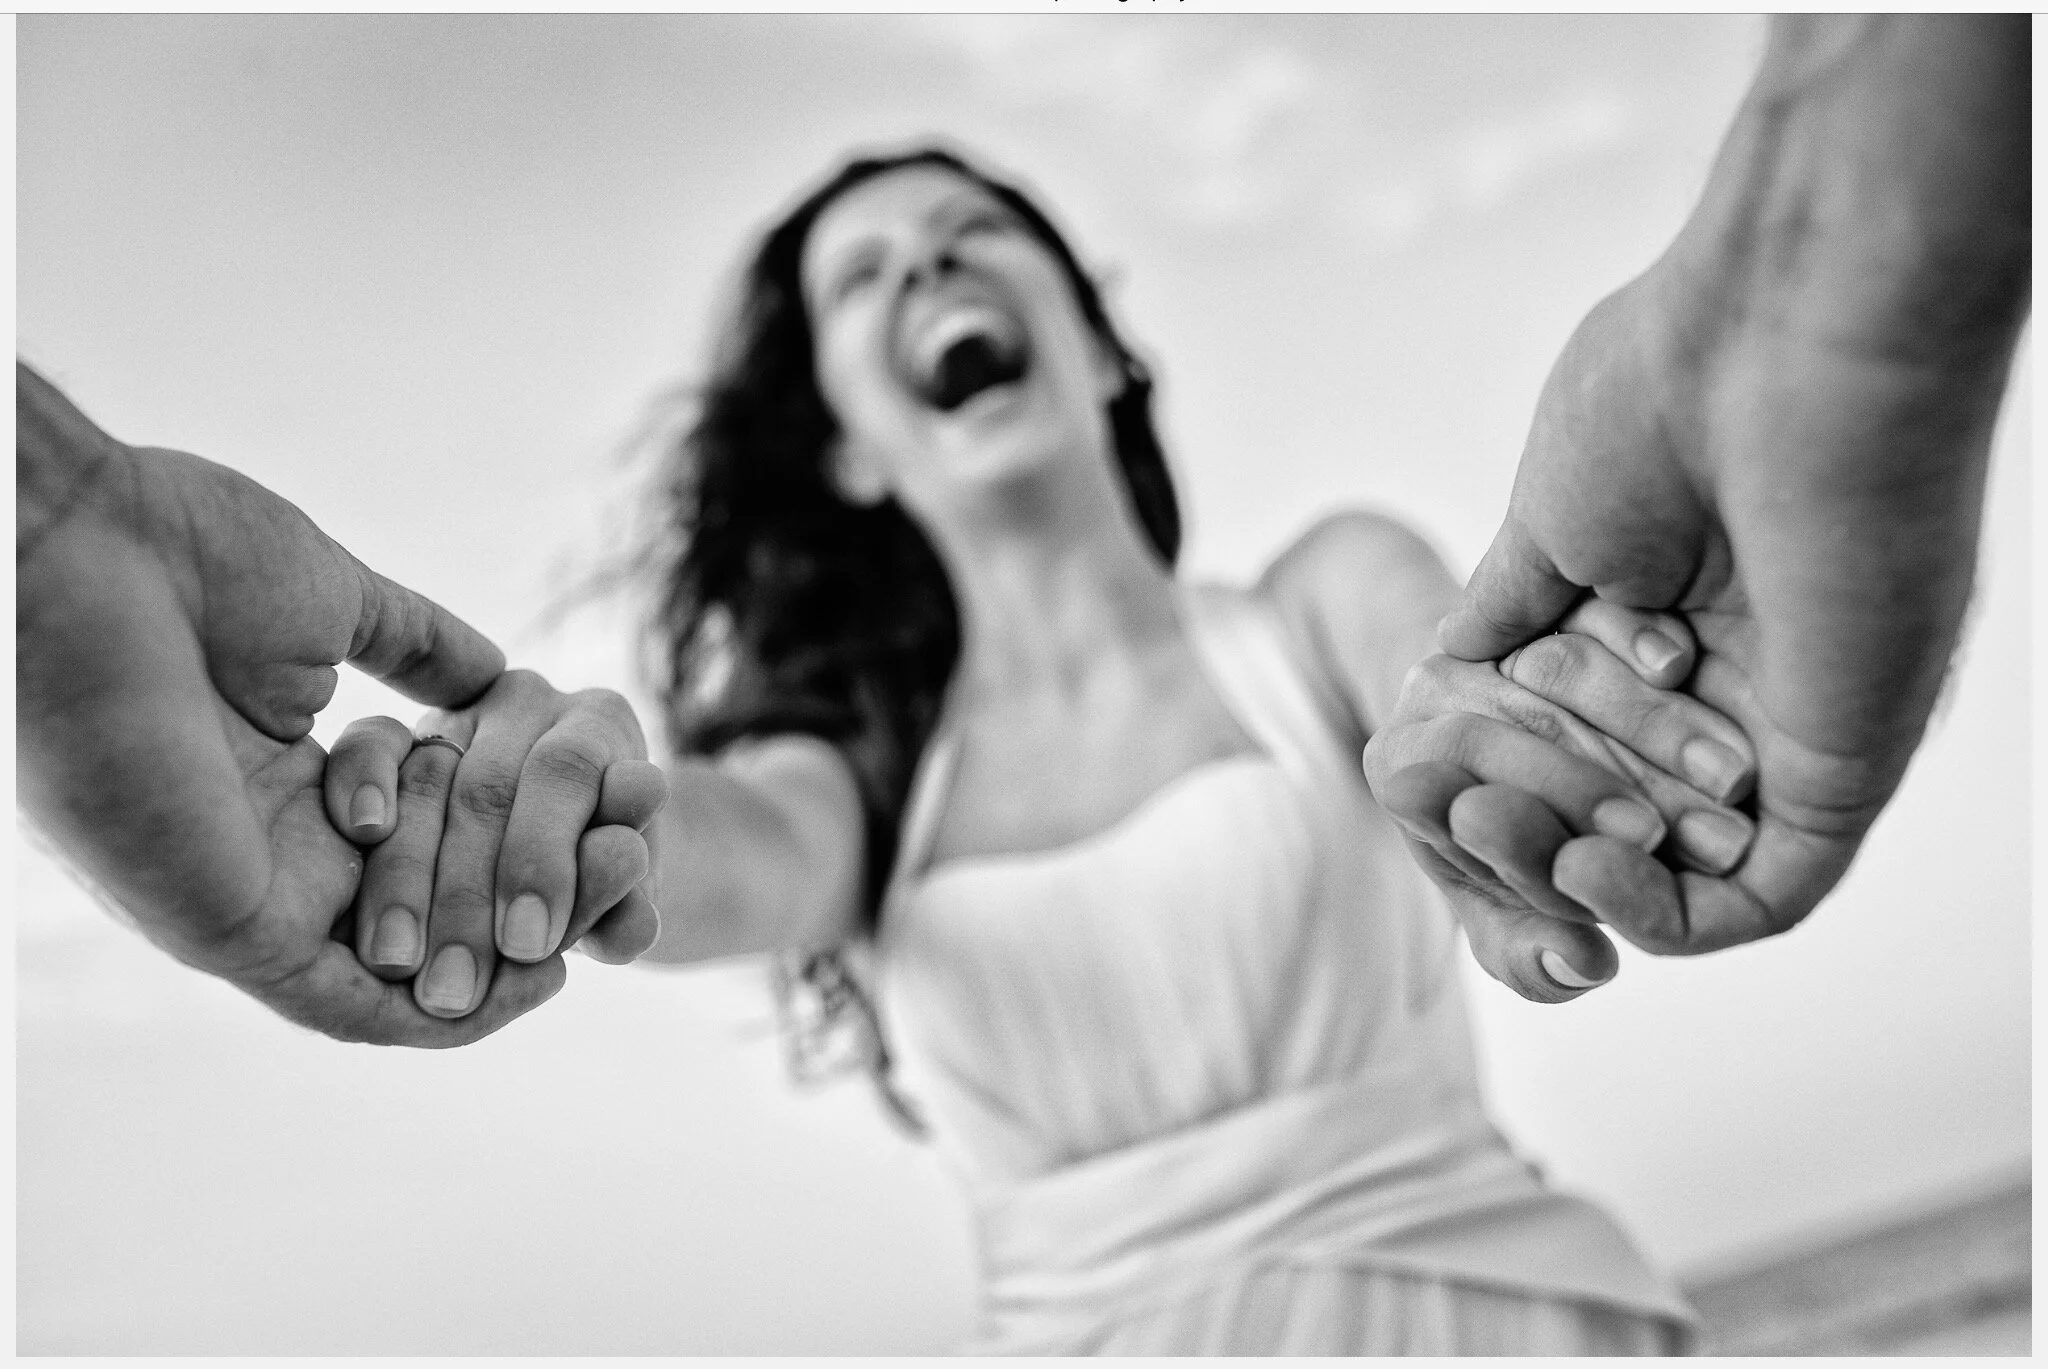
Again, like with the first image, this effect is probably being rendered for its “archetypal” value.
In other words, I don’t think the goal here was to emphasize the hands in the foreground over the bride in the background….I think the idea here was more that focusing on the hands instead of the face gives an excuse for the bride to be a bit out of focus, and that in turn gives the image a bit of an “abstract, painterly sensibility.”
And once again, I need to point out that this photographer isn’t worried that the disparate layers of space will confuse their focusing algorithms… they know these disparate layers of space are very useful to them.
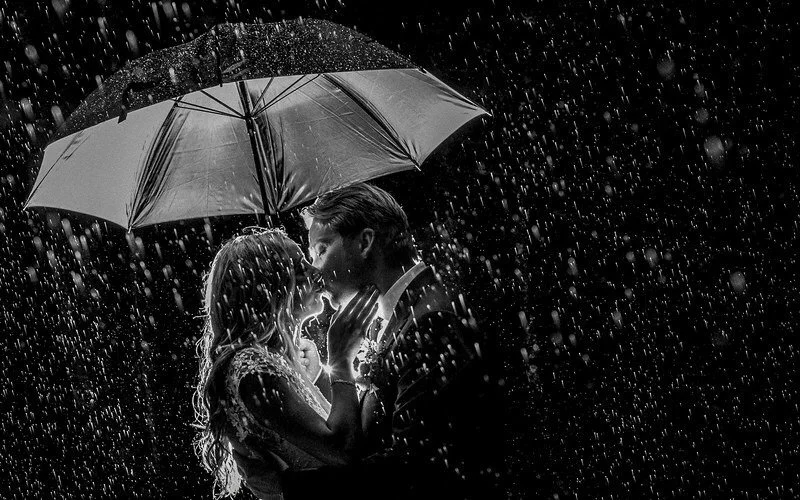
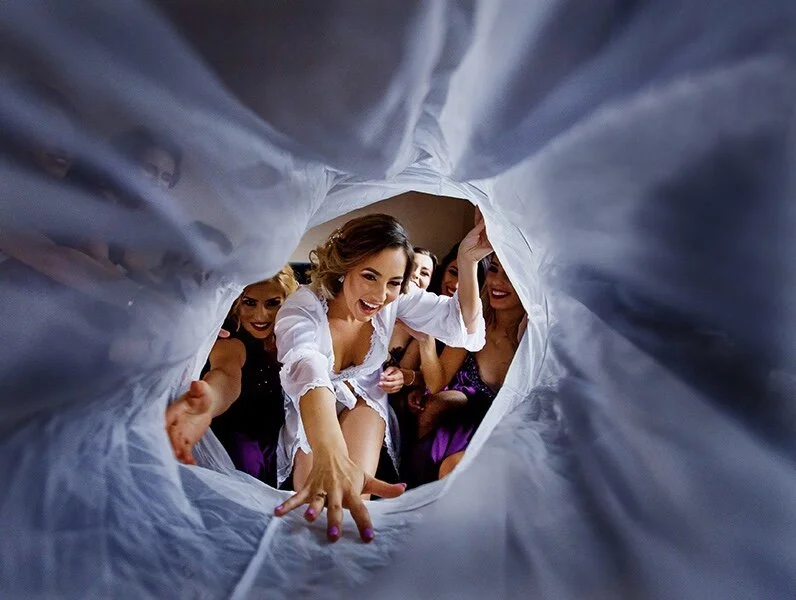
But let’s go back to Light again.
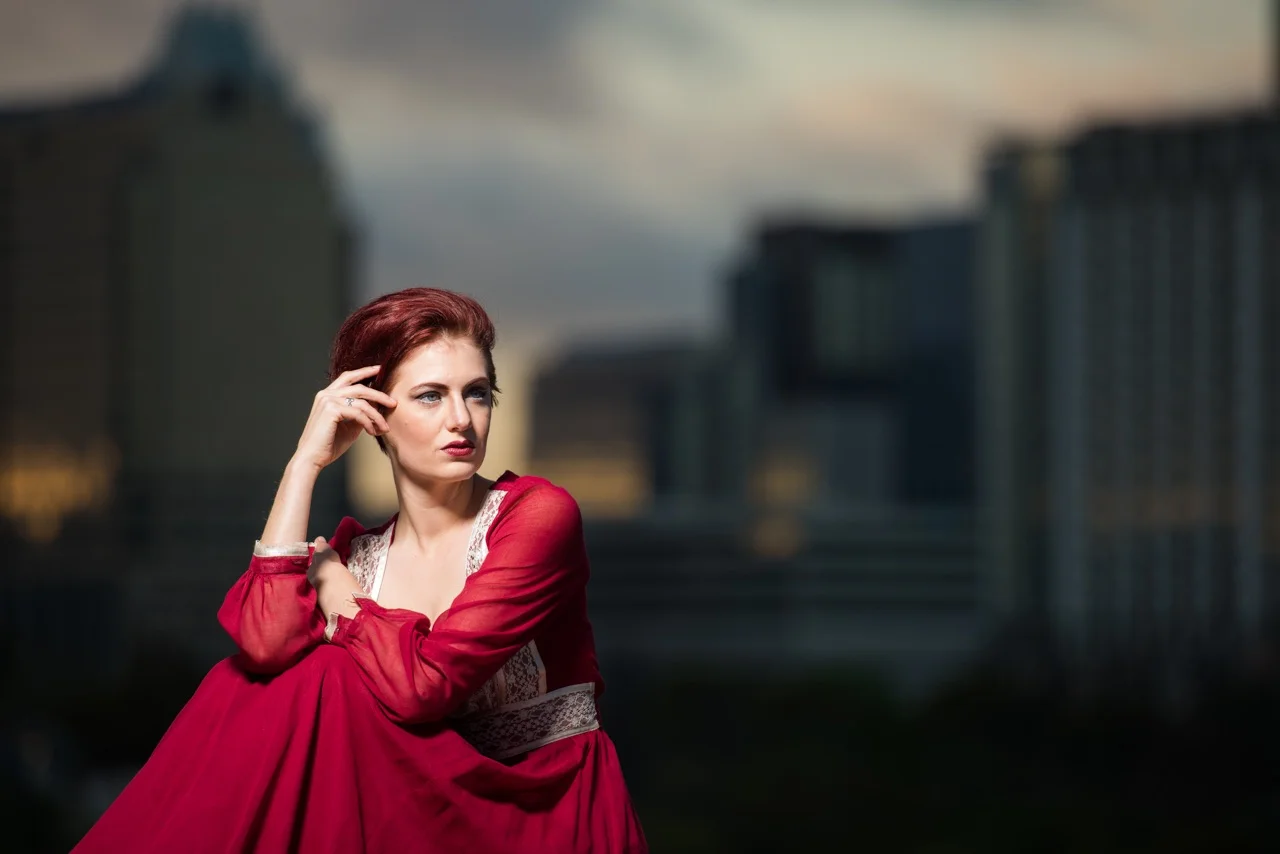
Here’s another 1-dimensional image (another “single variable” image). I.E., there are no layers of space, or movement, but there IS a substantial Light differential.
However this time the light differential is helping to emphasize one part of the frame over another.
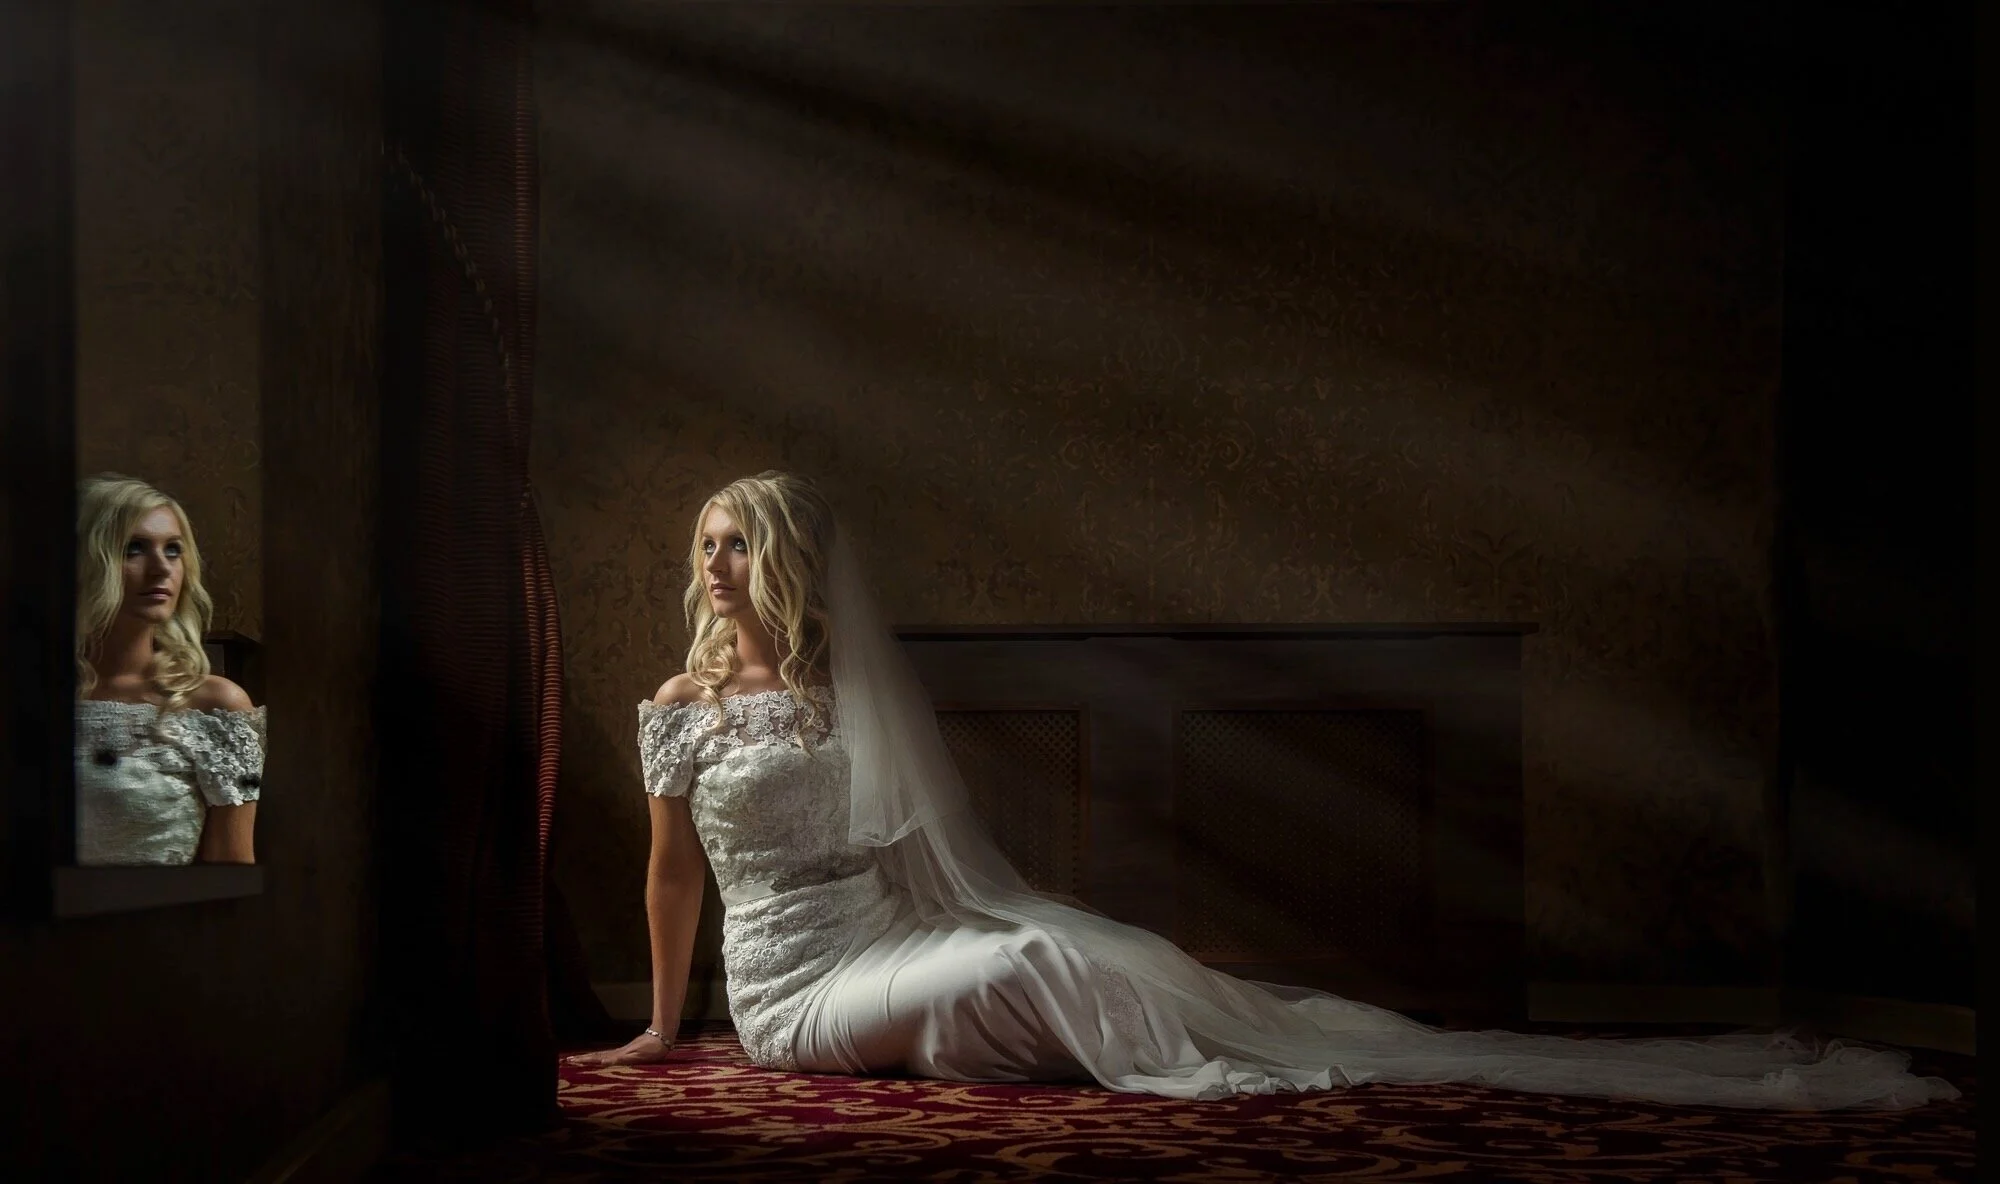
In other words, where does your eye go when you look at this image?
I’m betting it immediately goes to the lower left quadrant. Whereas hardly anyone is ever going to look to the upper right quadrant.
So while the Light differential is probably still affecting the mood and the sentiment of the image, the photographer is ALSO using that Light differential in order to dictate where our eyes should look. Which means they’re using it to control how our eyes interact with the frame.
And that’s our SECOND incentive (so far) for using a Light differential. It can be used to affect both mood and emphasis.
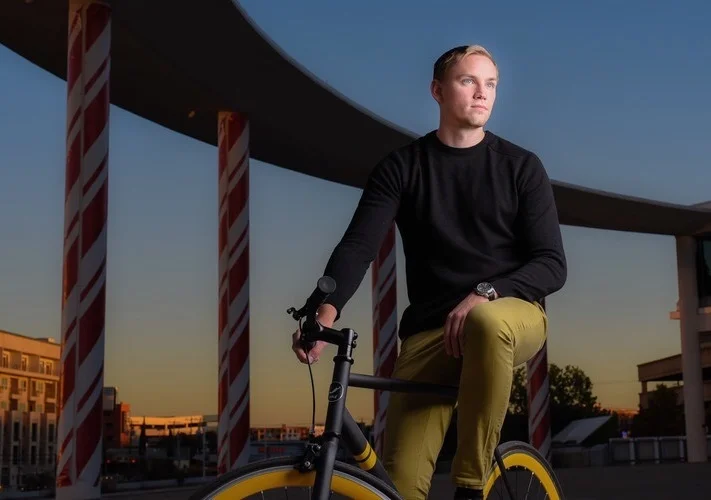
But now let’s go back to using layers of Space again….this time more for emphasis purposes:
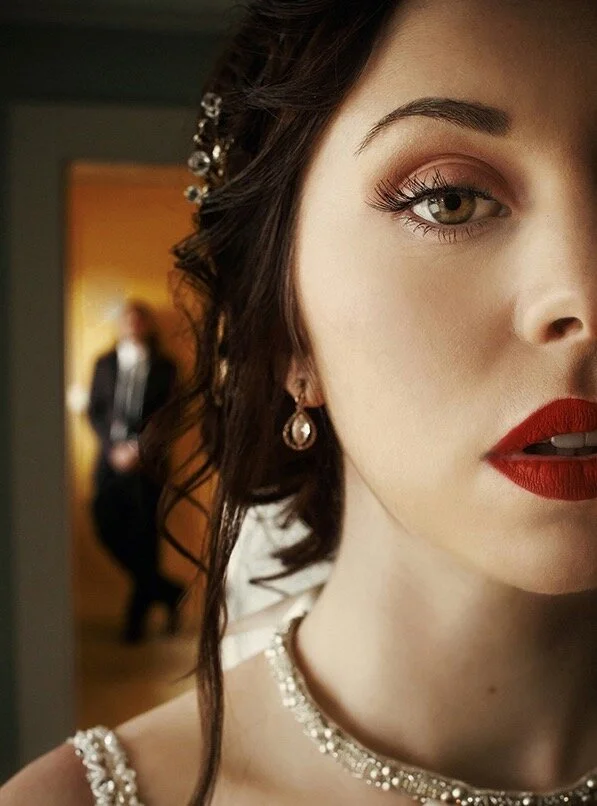
Here the bride is being heavily emphasized over the groom in the background.
In other words, you could say that the bride is the “subject” of the photograph, and the groom is there in order to provide context. There’s a relationship between the bride and groom, but the bride is primary and the groom is secondary.
But again, I should pause here and reiterate that, as clever as these images may appear at first, it’s important to remember that these are all still just 1-dimensional images.
Each shot is exploiting only one variable at a time, which is, sure, a little more sophisticated than those first few images (which didn’t exploit any variables at all), but one thing we’ll find throughout this curriculum is that executing “one trick” images isn’t as impressive as it may first appear.
The key to really sophisticated images is COMBINING several of these maneuvers.
So let’s up the ante a bit, shall we?
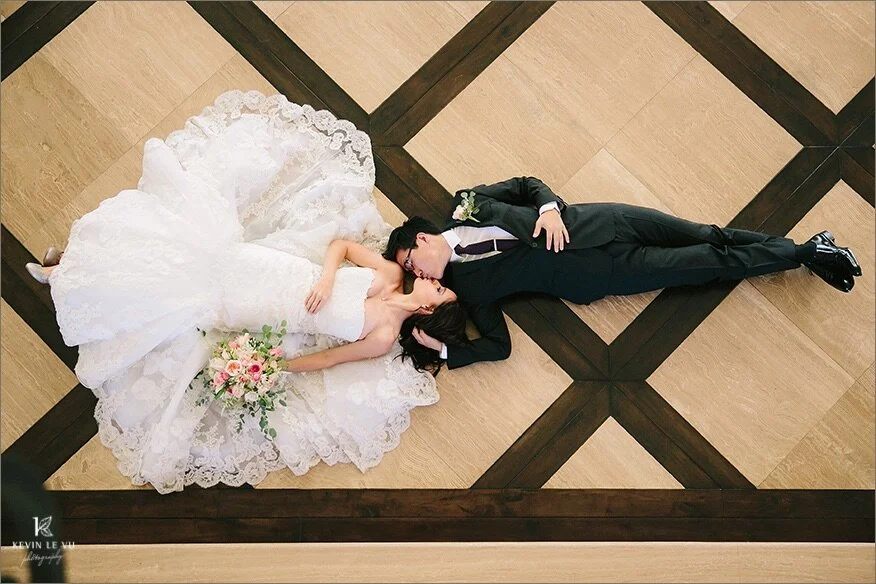
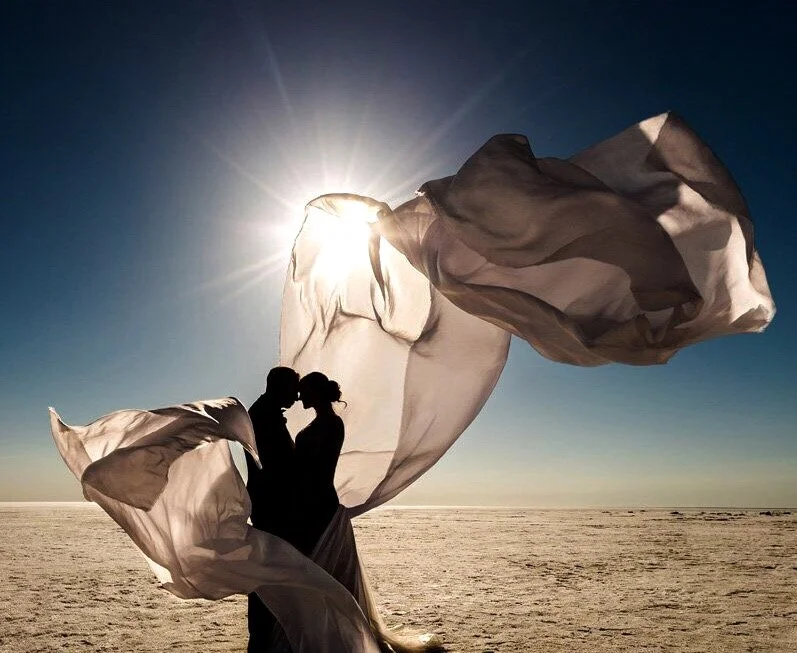
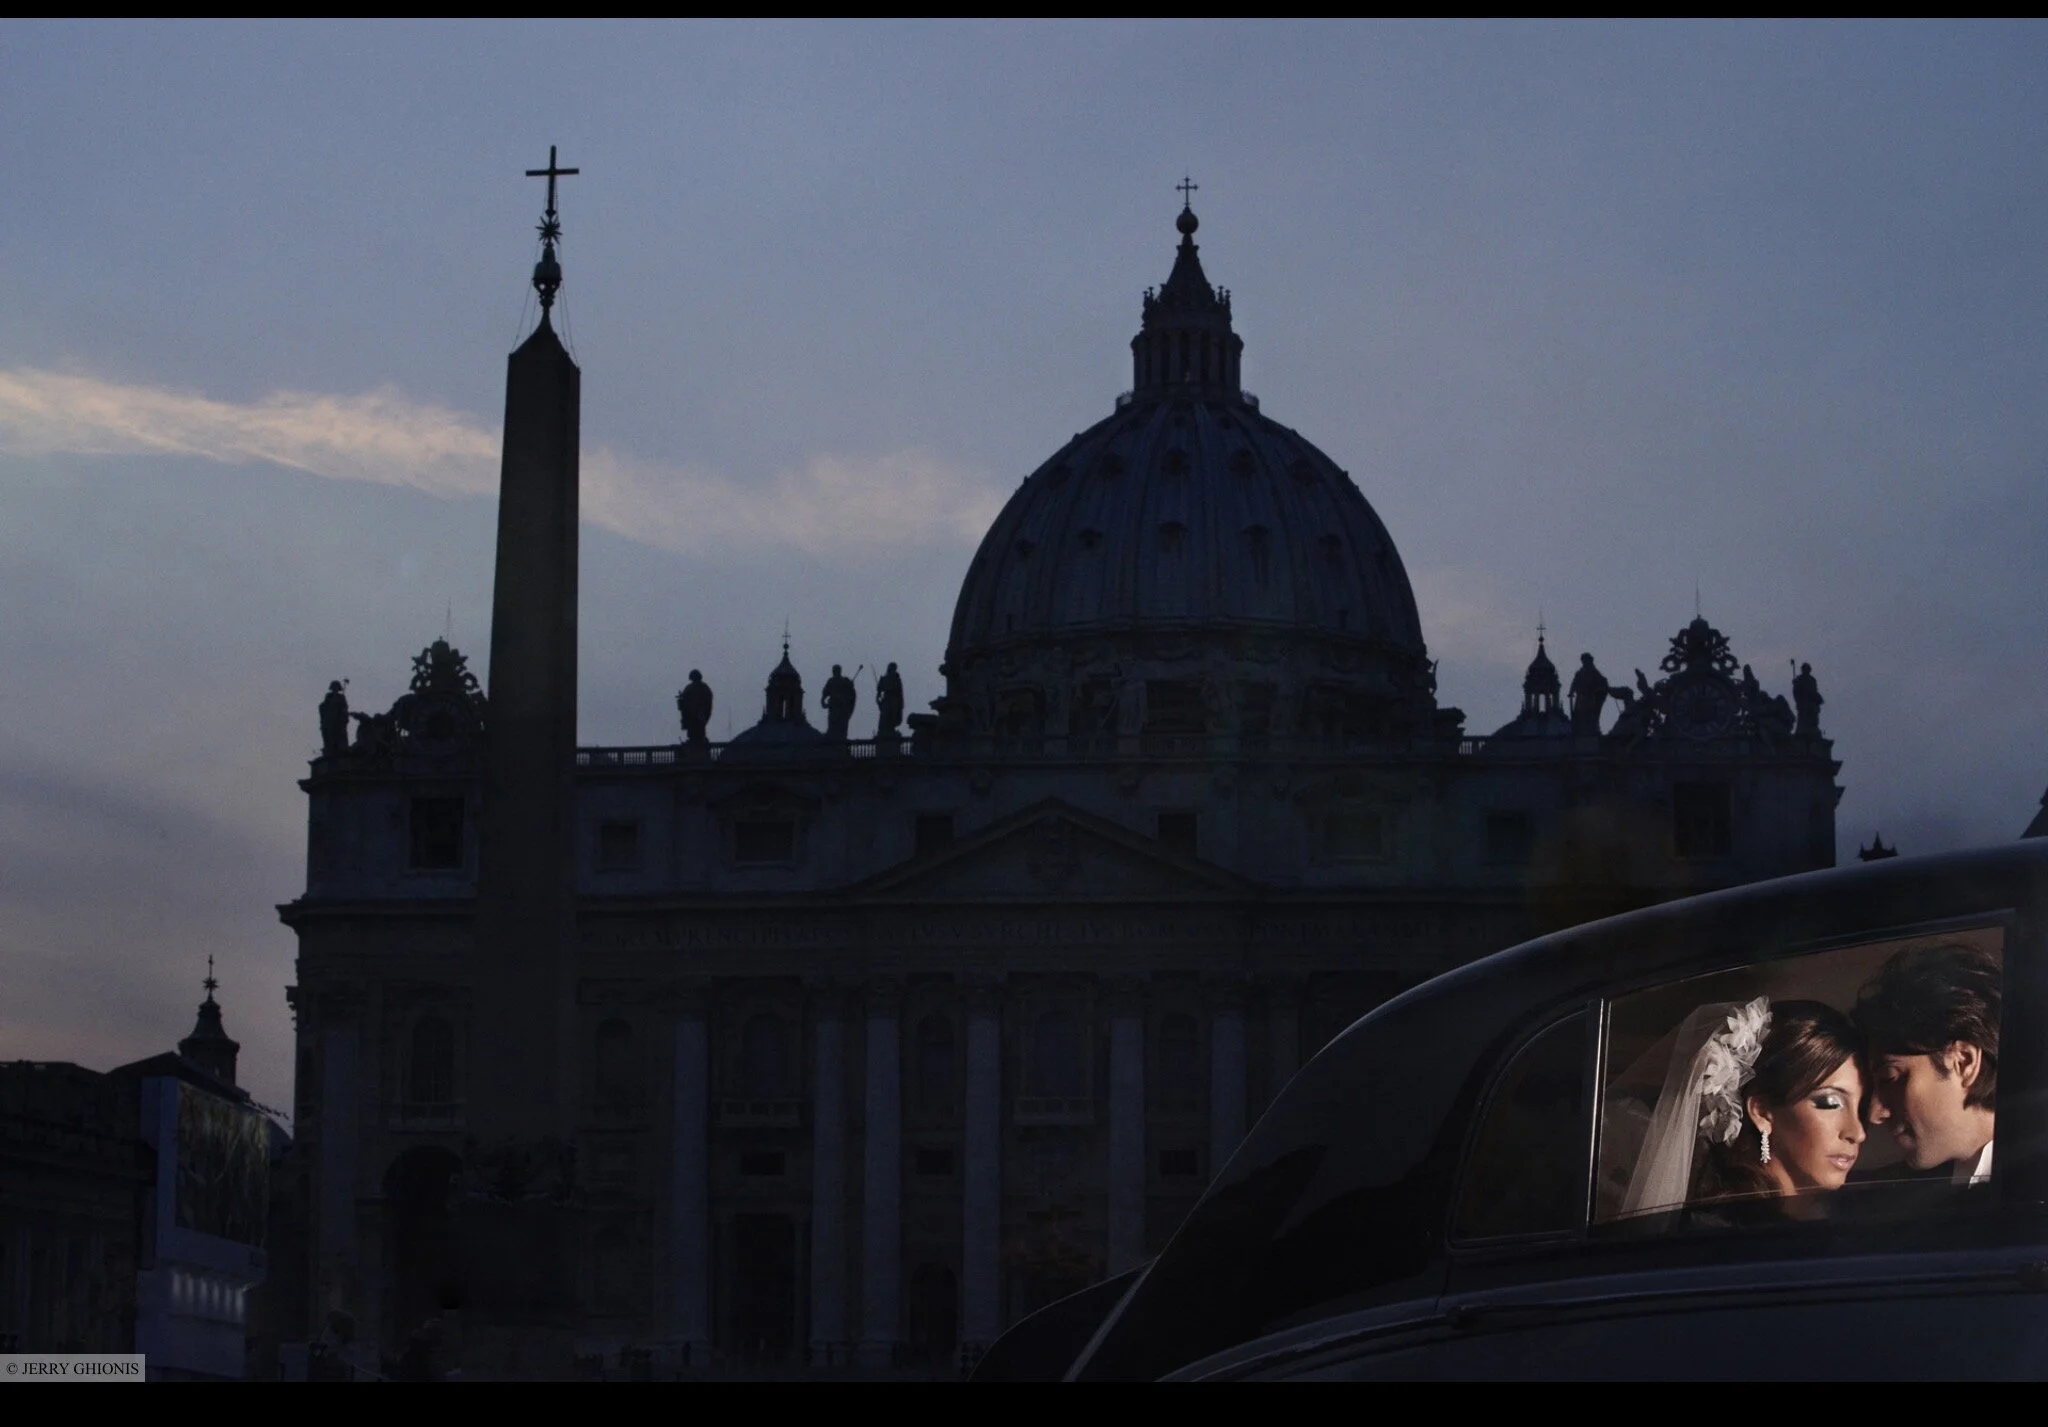
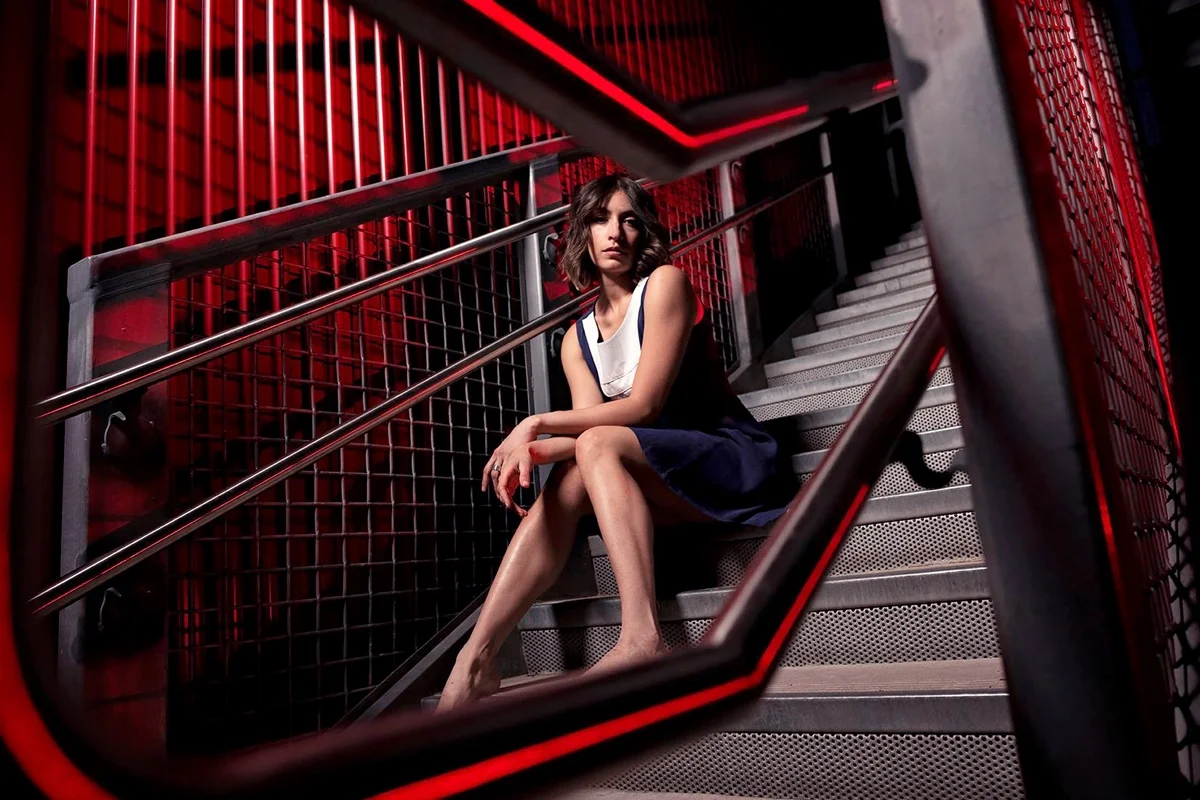
Let’s look at our first “2 dimensional” image.
In this case, the photographer is using both a Light differential and multiple layers of Space, all within the same construct:
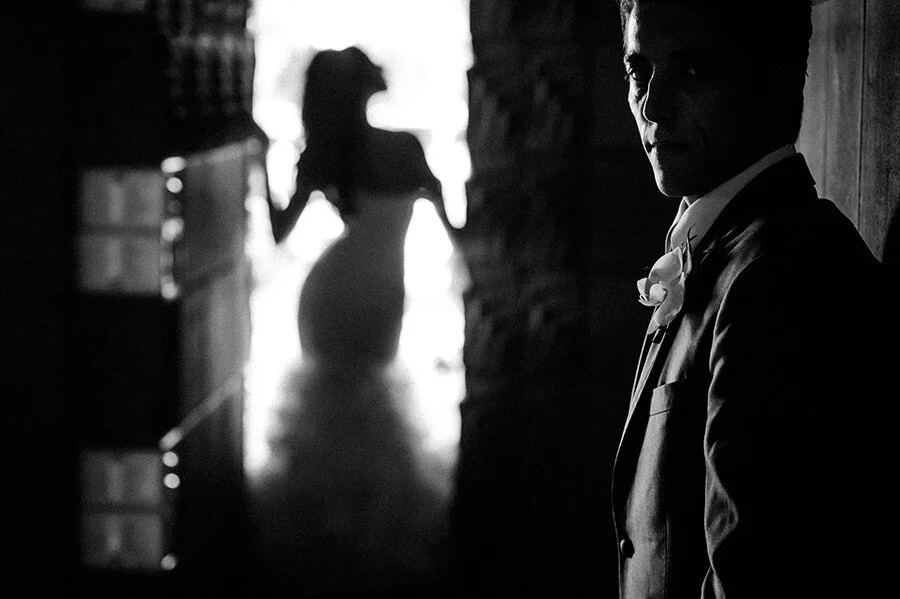
In my experience, when looking at images like this one, the layperson often reaches for very qualitative vocabulary. They might say something like “this image is dramatic, or CREATIVE,” or that the photographer here is more “talented,” or “has a good eye.”
But they maybe can’t quite put their finger on why this image is different that those first images.
But to an ASOP student, this is actually fairly simple: this photographer has merely combined a light differential AND a space differential in the same image.
In other words, once you’ve learned how to employ ONE of these strategies, and then you’ve learned how to employ the other, it really isn’t that difficult to combine them.
Importantly, once you’ve ORGANIZED YOUR THINKING in this particular way, these images no longer seem so intangible or mystical…. they just start to make TOTAL sense….at which point you begin to find that they aren’t that difficult to execute.
Which means you won’t be hoping for “lucky shots” (as so many photographers seem to do) and you won’t have to hope for a moment of divine, creative inspiration…you’ll simply know how to construct an image like this any time you want.
But on the flip side, I have to say that if you stick with the more common paradigm, the notion that these images are the result of some abstract or intangible “talent,” or having a special “eye,” then not only will this medium be more difficult to grasp on a practical level, but worse, you might find yourself becoming preemptively discouraged, especially if you don’t tend to think of yourself as “someone who has a lot of creative talent.”
But let’s continue with our demonstration.
If that last image isn’t really your cup of tea - maybe it’s a bit more “arty” and abstract than you want - here’s a more conventional example of an image that combines both Light and Space differentials within the same image:
But let’s up the ante again.
Let’s now add a third variable.
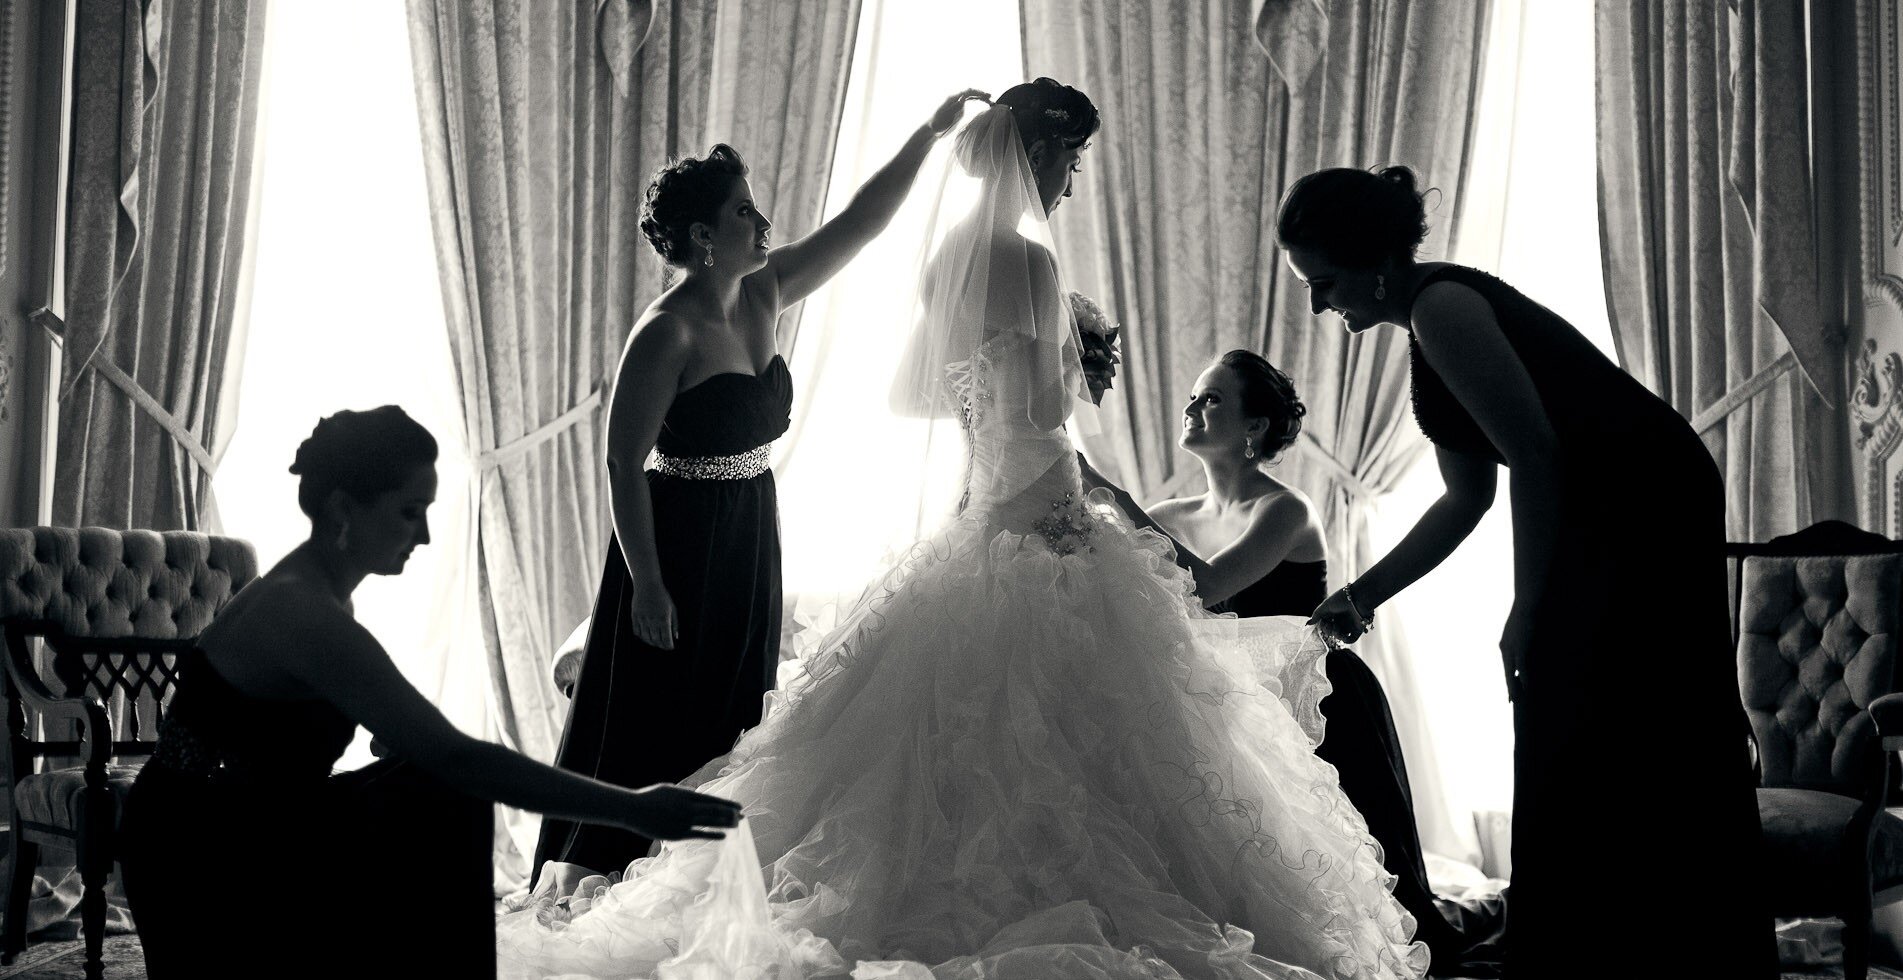
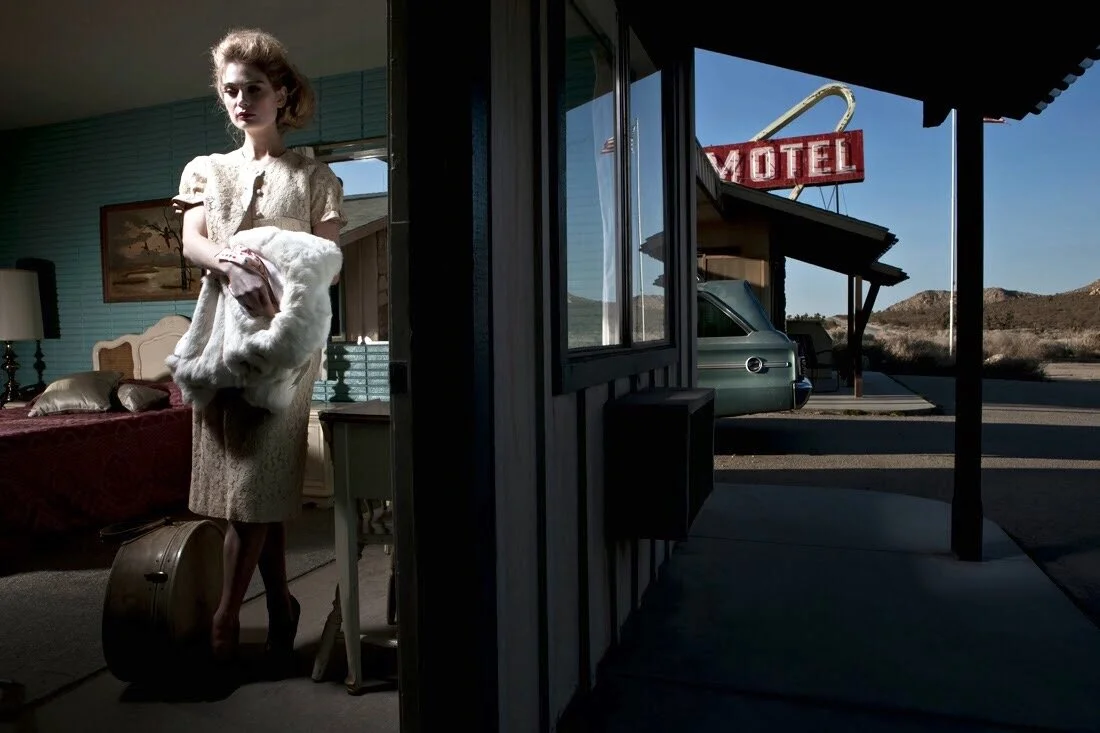
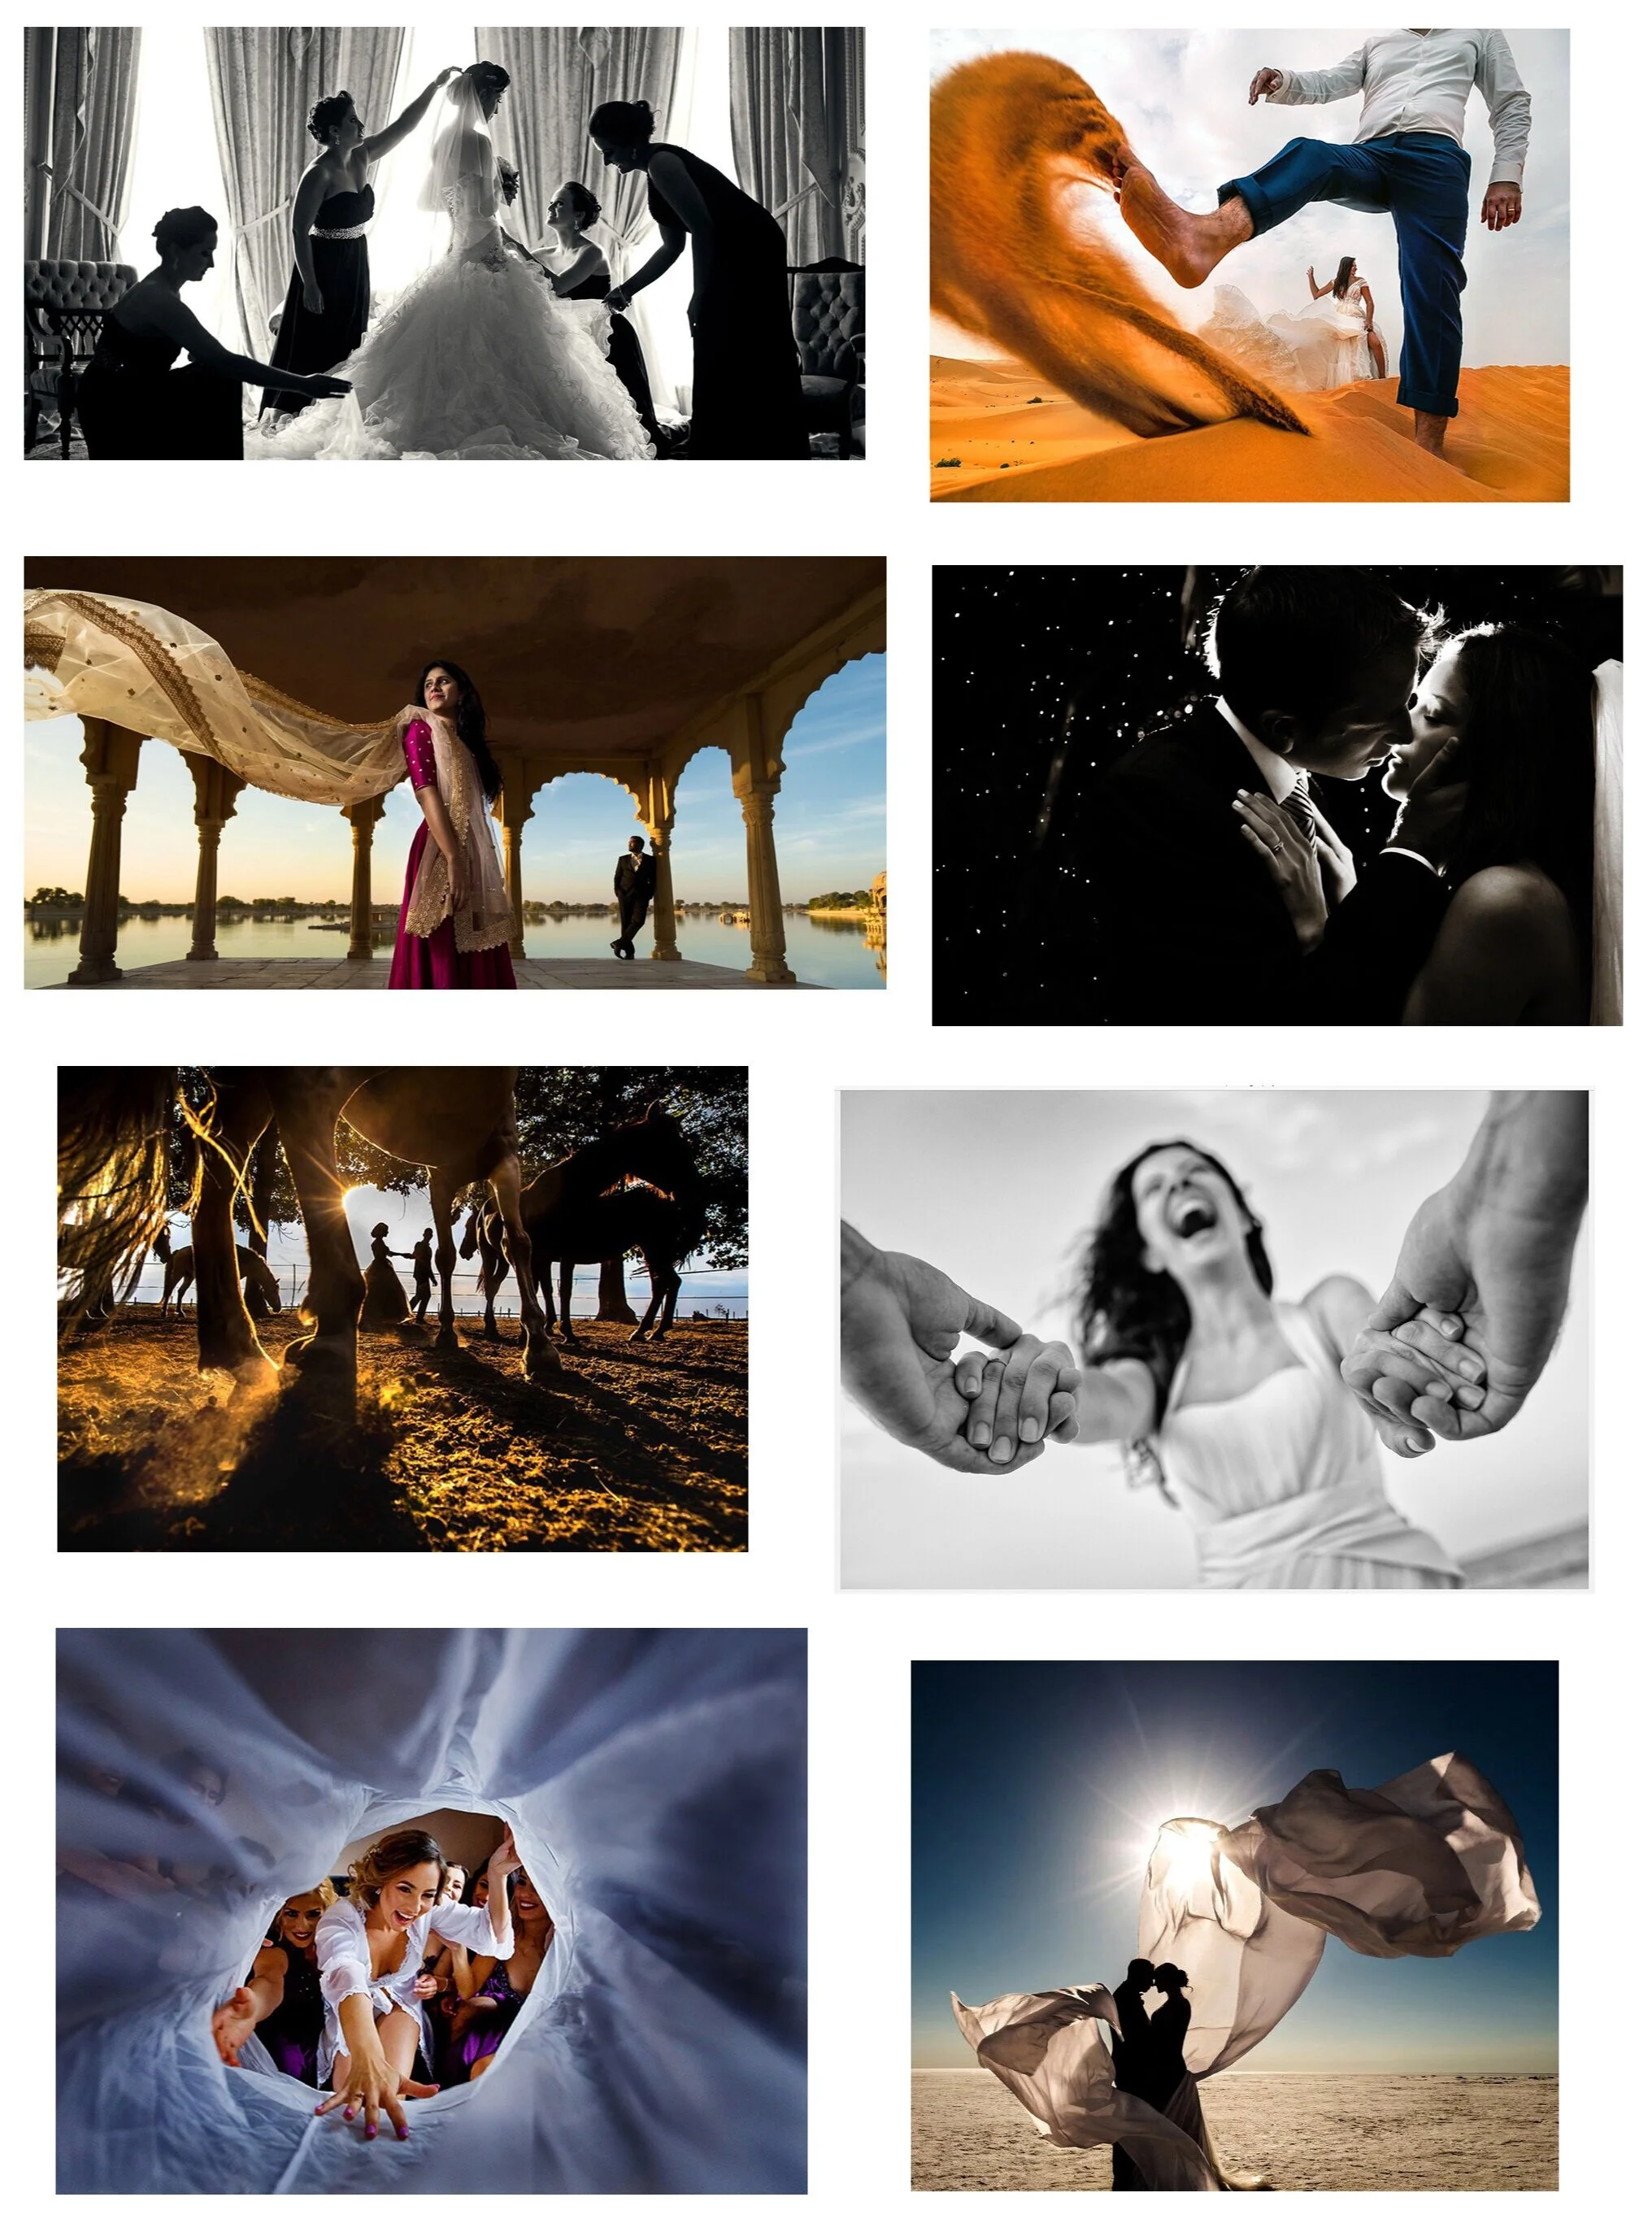
Here we have Light differentials, multiple layers of Space, and now also Movement:
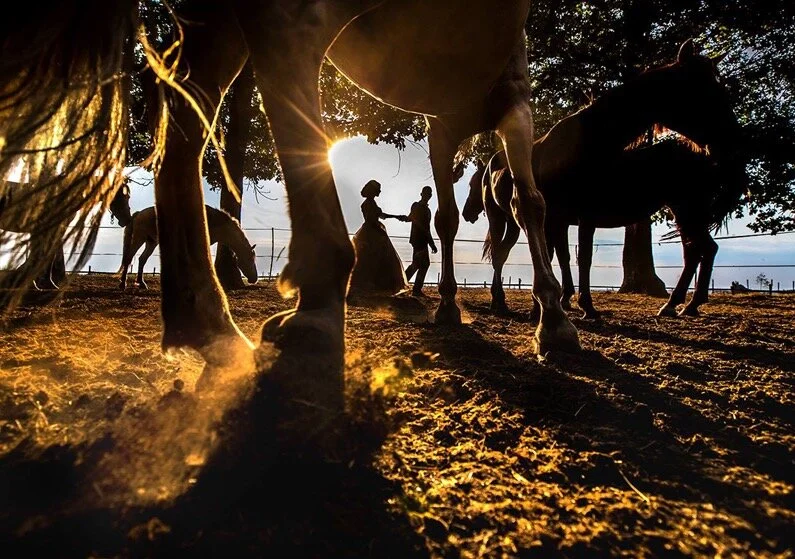
And now we’re getting into images that most people think of as “world class” or “award winning” images.
And point of fact, these images did win awards. That’s how these images came to my attention.
By contrast, I found the first set of images above simply by doing a google search for “wedding portraits.”
But again, it is important to note that the layperson often has a hard time putting their finger on EXACTLY what makes these images different. They tend to think that it’s intangible or indescribable, or maybe that these photographers simply had access to better equipment, or “better moments.”
But ASOP students realize that this is all a lot more concrete than that, and whole lot more logical.
Once you understand how photography really works beneath the surface, it becomes a bit like when a magician reveals the secret to one of their most popular illusions…which is to say that it’s almost disappointingly simple.
And similarly, we’re going to find that “upper tier” photography may seem magical and intangible to the uninitiated - to those who have neither the training, nor the VOCABULARY - but as we move forward with this curriculum, it will all gradually become very logical and very obvious how these types of images are made.
But in this particular case, this kind of image is made by simply and logically combining three well-known strategies within in the same shot…. not by having some indescribable whim of creativity, or some intangible “creative eye.”.
Now I should pause here, before anyone panics, and point out that I don’t expect anyone to know HOW to do any of these things yet.
In fact, that’s what most of this curriculum is going to be about - HOW to do these things. We’re going to learn how to manipulate each of these properties, one at a time, and very thoroughly.
And then, once we understand them individually, we’ll very gradually work toward understanding strategies that allow you to combine them.
But for now….all we’re doing is introducing some ideas and vocabulary, so that you can get into the proper frame of mind.
So in that spirit, let’s look at a just a few more examples, with the goal of getting you ACCLIMATED to looking at these types of images, while simultaneously thinking about this kind of vocabulary.
So as you look at each image, instead of thinking vaguely about how “dramatic,” or beautiful” the image is, please read the caption to see which “differentials” are being used:

Alright.
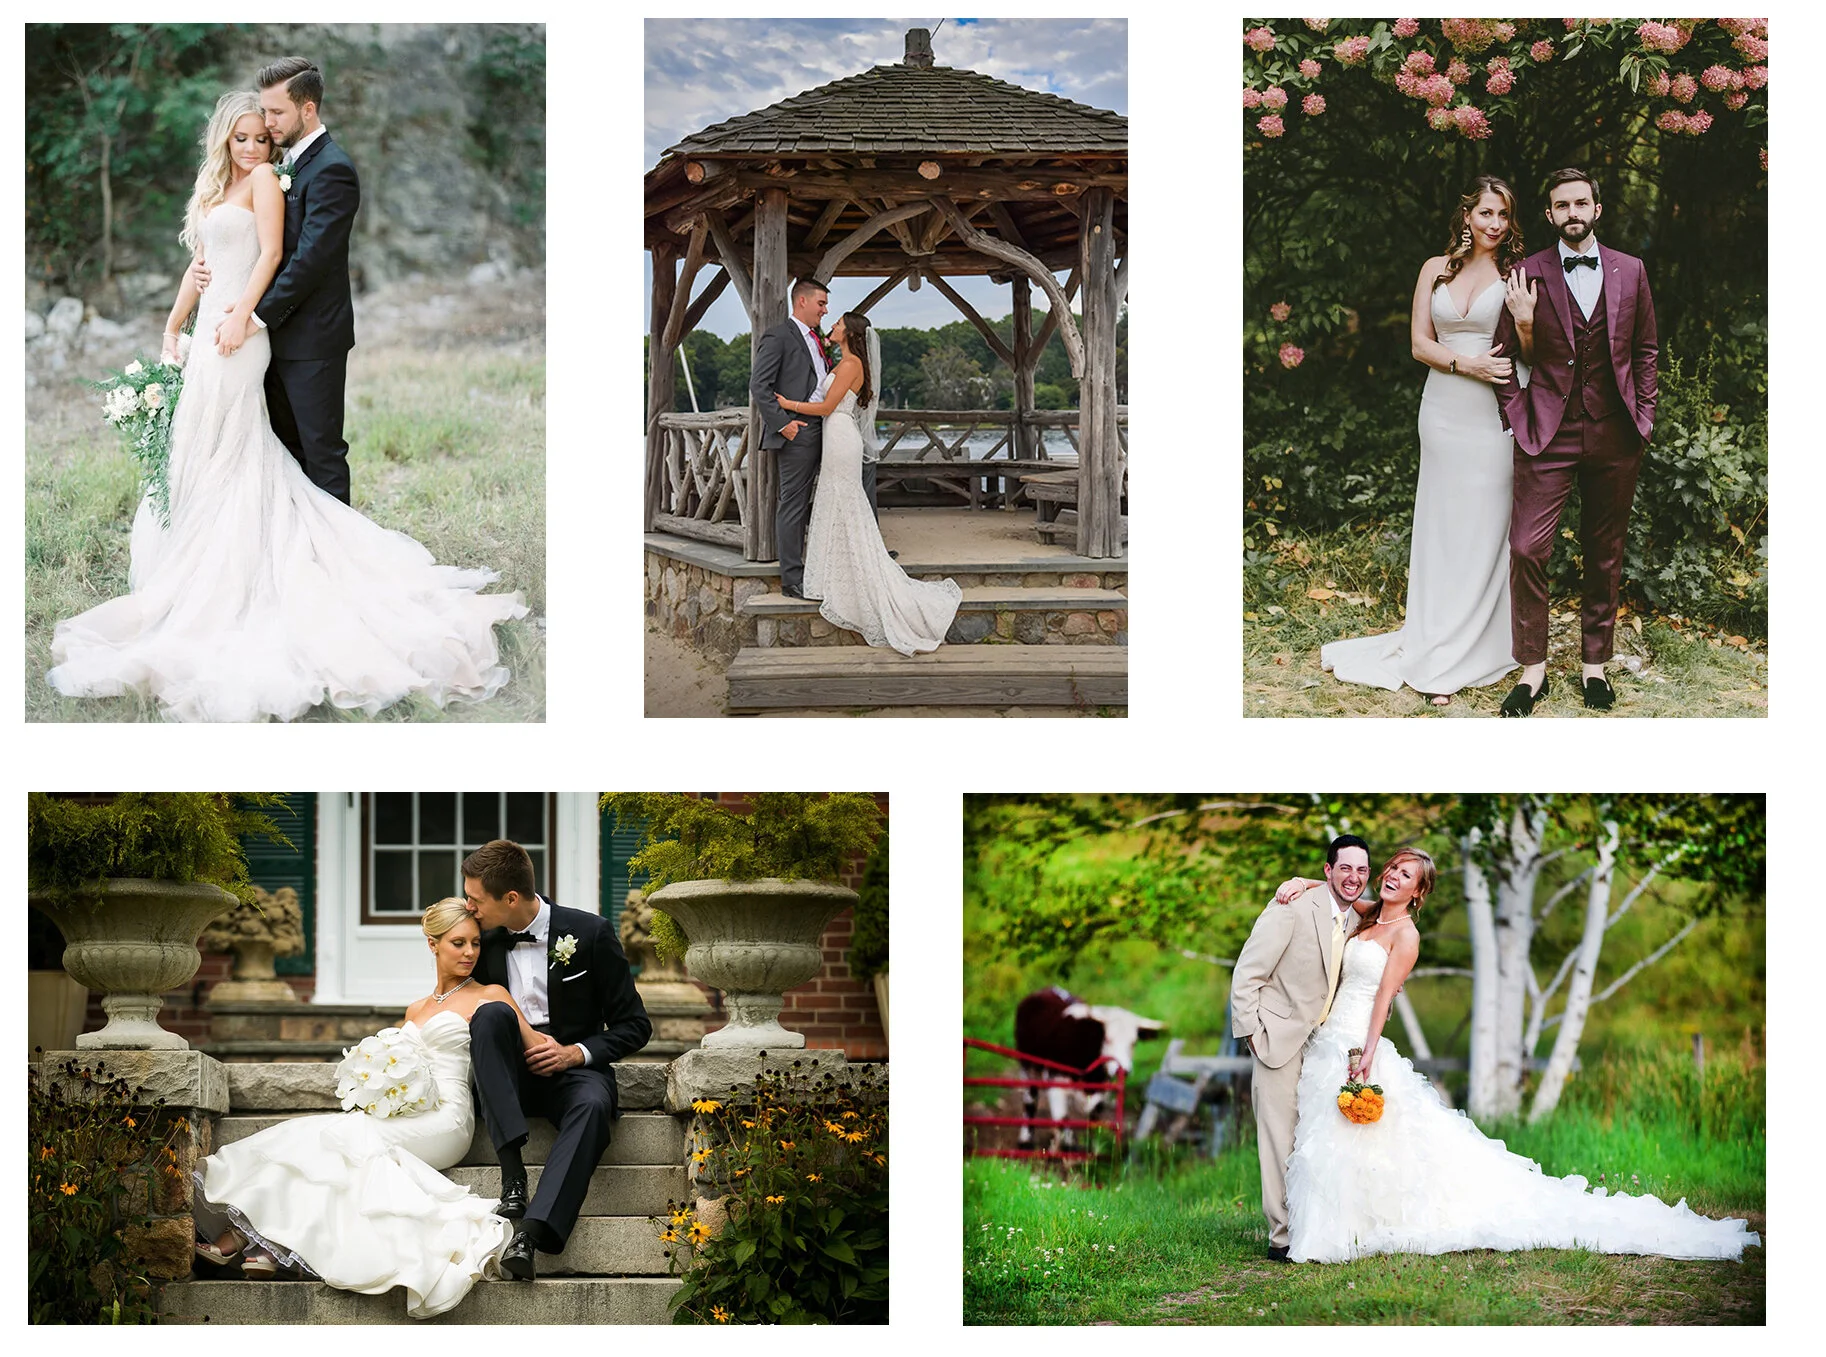
So now that you’ve become accustomed to looking at images like these, WHILE ALSO thinking about the variables these photographers are using…. let’s now return to that first set of images.
Here’s a batch of images just like the first ones we looked at….see if you don’t perceive these images just a little differently than you did a minute ago.


Is it more obvious now? Can you see how these photographers have been taught?
They’ve been taught to rid the scene of all physical variables.
And I should say I’m genuinely not trying to be derogatory about these images here. I’m actually trying to be as matter-of-fact as possible.
Really I’m just trying to CATEGORIZE these images.
Whether someone prefers one set of images to the other is actually pretty immaterial. What matters is that you should be able to see that these two sets of photographers are very FACTUALLY using different approaches.
Furthermore, I’m also trying to establish that one of these groups consistently out-earns the other, and enjoys more overall success. Which means I’m just trying to connect the dots as far as who is rising to the top of this industry, and who is remaining stagnant.
Far too many people still believe that high-end photographers succeed based on some kind of supernatural talent, or superhuman vision. Which isn’t true at all. They succeed based on how deeply they understand the medium, and how much they USE the medium. Or how “photo-literate” they are.
But getting back to these kinds of images:
It’s possible that when you were looking at these images the first time, you might have been thinking to yourself “I don’t know…these images all look different to me,”
But that can only be true if you look exclusively at the subject matter - ie: at the “people” and “locations” in each shot.
Hopefully now it’s easier to see the “sameness” I’m referring to. Because regardless of the specific people and locations involved, it should be pretty obvious that these images have all been SHOT the same way.
And most importantly, hopefully you can also now very clearly see that these photographers have been trained to AVOID any kind of variable at all costs, because these variables get in the way of all those fancy algorithms and “solutions” they spent several months learning about in their workshops.
And as a side note, in my experience, these photographers seldom realize that this is what they’ve being taught. Because it’s never overtly expressed to them this way.
Instead what happens is they attend workshops that offer advice on “how to take an engagement photo,” and it’s never explicitly stated to them that the main reason these formulas exist is to satisfy the limitations of their programmed camera features.
But there is a fundamental difference between a photographer who has been taught to AVOID the underlying properties of this medium, and those who are taught to EMBRACE the underlying properties of this medium.
And that’s the gist of what I need you to take from this.
So just for good measure, let’s briefly go through the exact same progression of logic, but with another type of professional photography…this time “portraiture.”
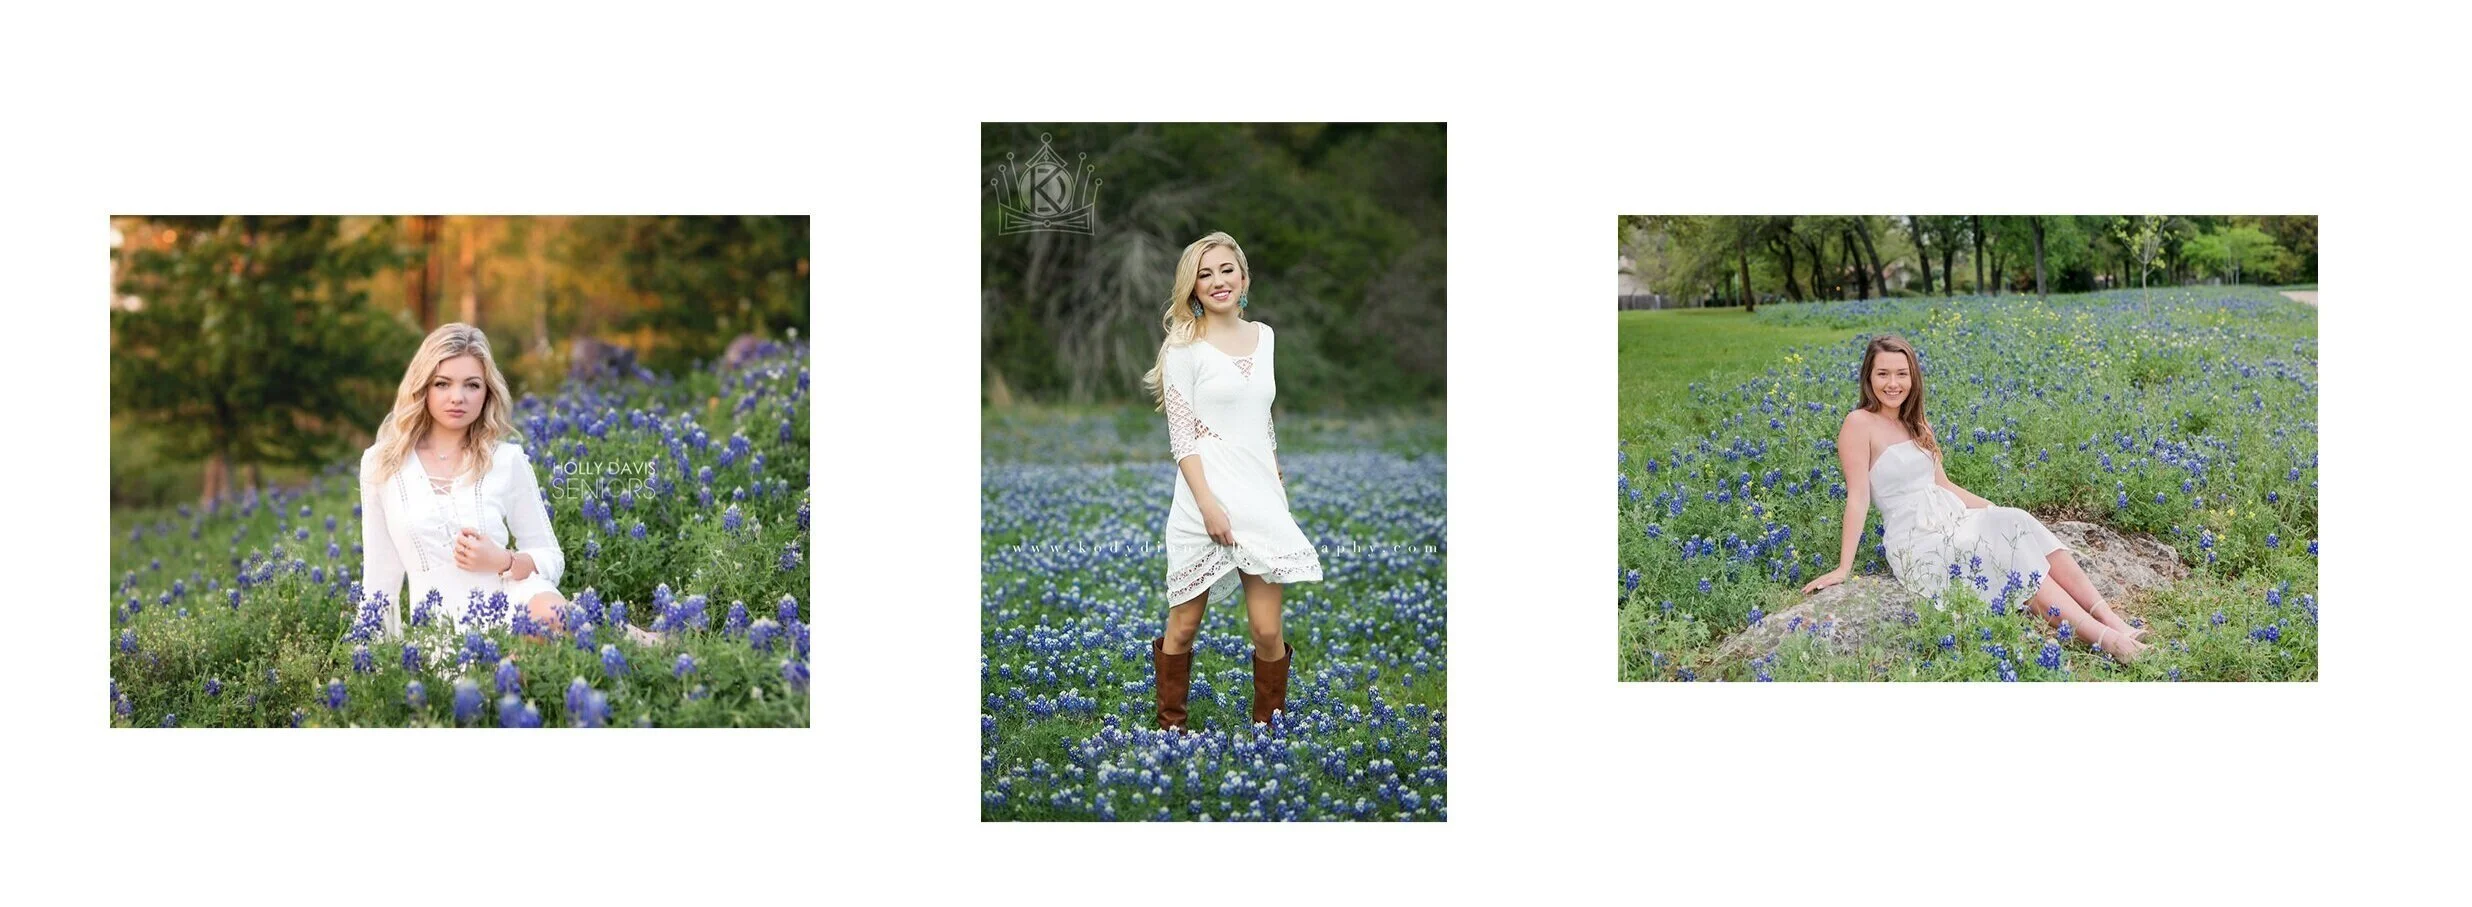
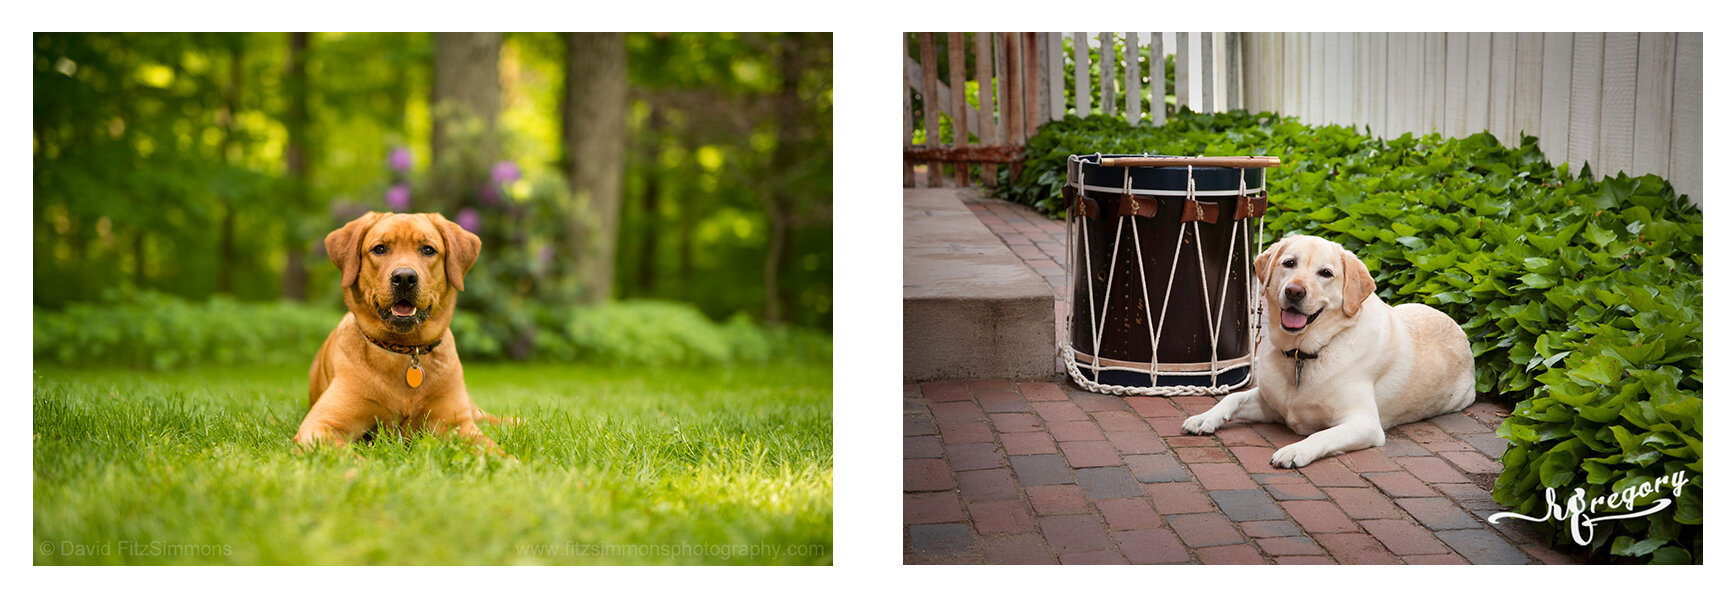
For starters, here are some examples of typical, “going-rate” portraiture:
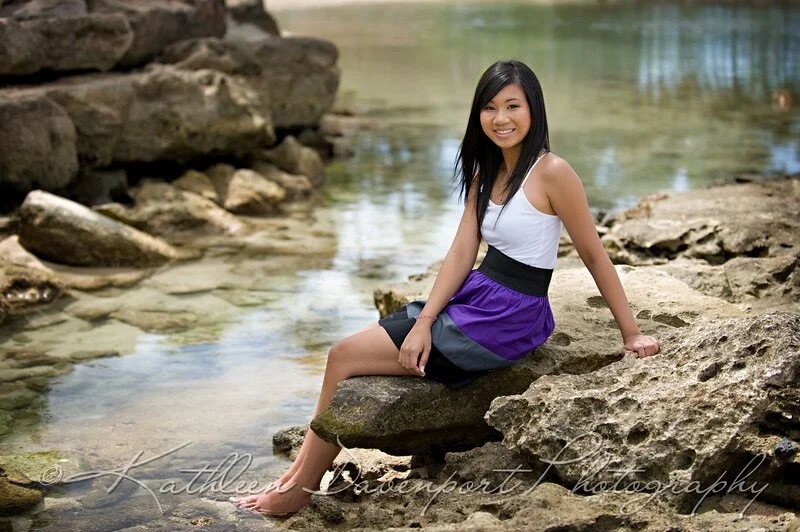

Again you can see that these images are structured so that they’re all very flat, very evenly lit, and nothing’s moving.
And again, this leads any photographer who is trained in this way to have to compete using non-photographic virtues, such as their posing skills or their location scouting abilities.
So they find a good set of railroad tracks:
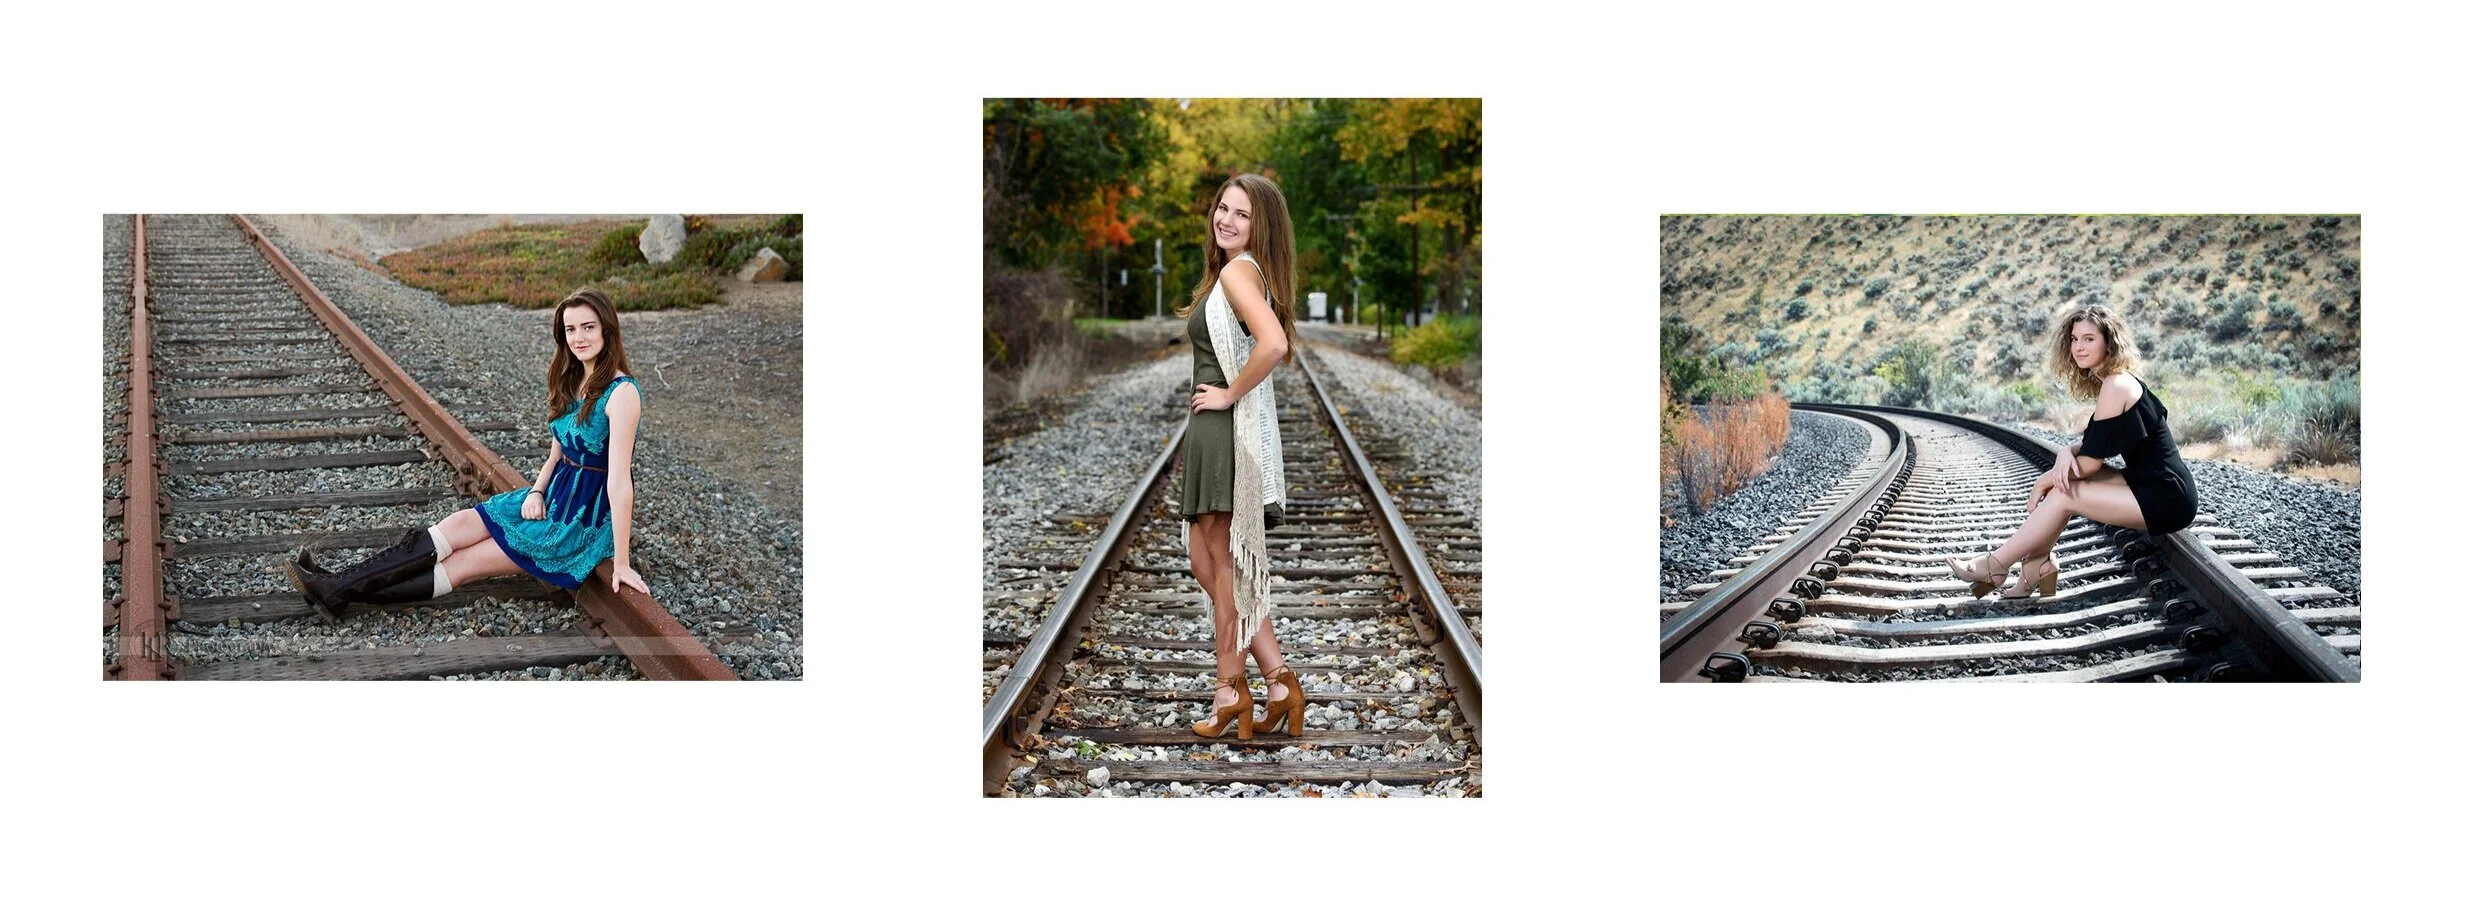
Or a nice field of flowers:
And again, I know this can all start to sound a little bit cynical and glib, but I really do need my students to see the distinction in these two approaches….and specifically how they’re based on completely opposite priorities.
One approach avoids differentials (and then relies on non-photographic virtues, such as location and posing). While the other approach still uses location and posing skills, but then adds some photographic structure on top of it by exploiting photographic variables.
So let’s add some differentials into this process, shall we?
Let’s begin by purchasing one single studio light (often for just a couple hundred dollars), and using it to “sculpt” our subject’s face with some shadows…as opposed to having our subject be lit as evenly as possible:
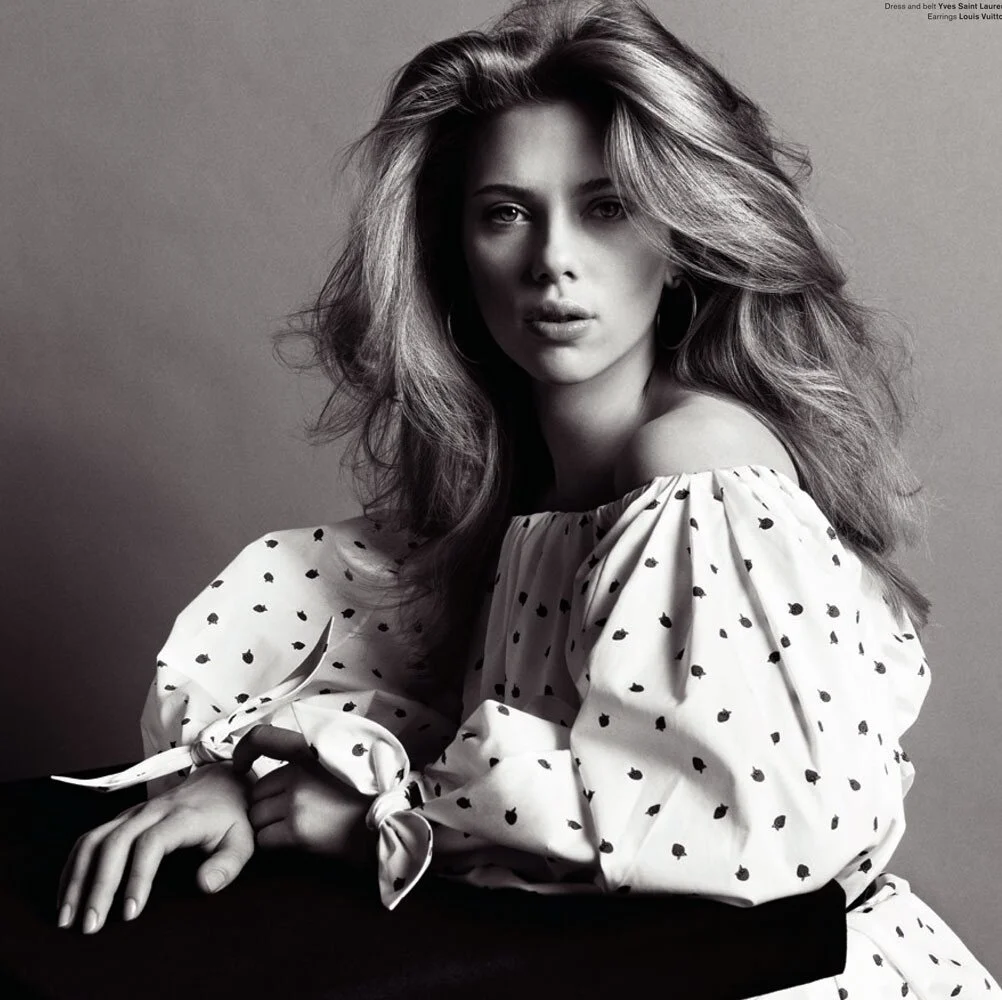
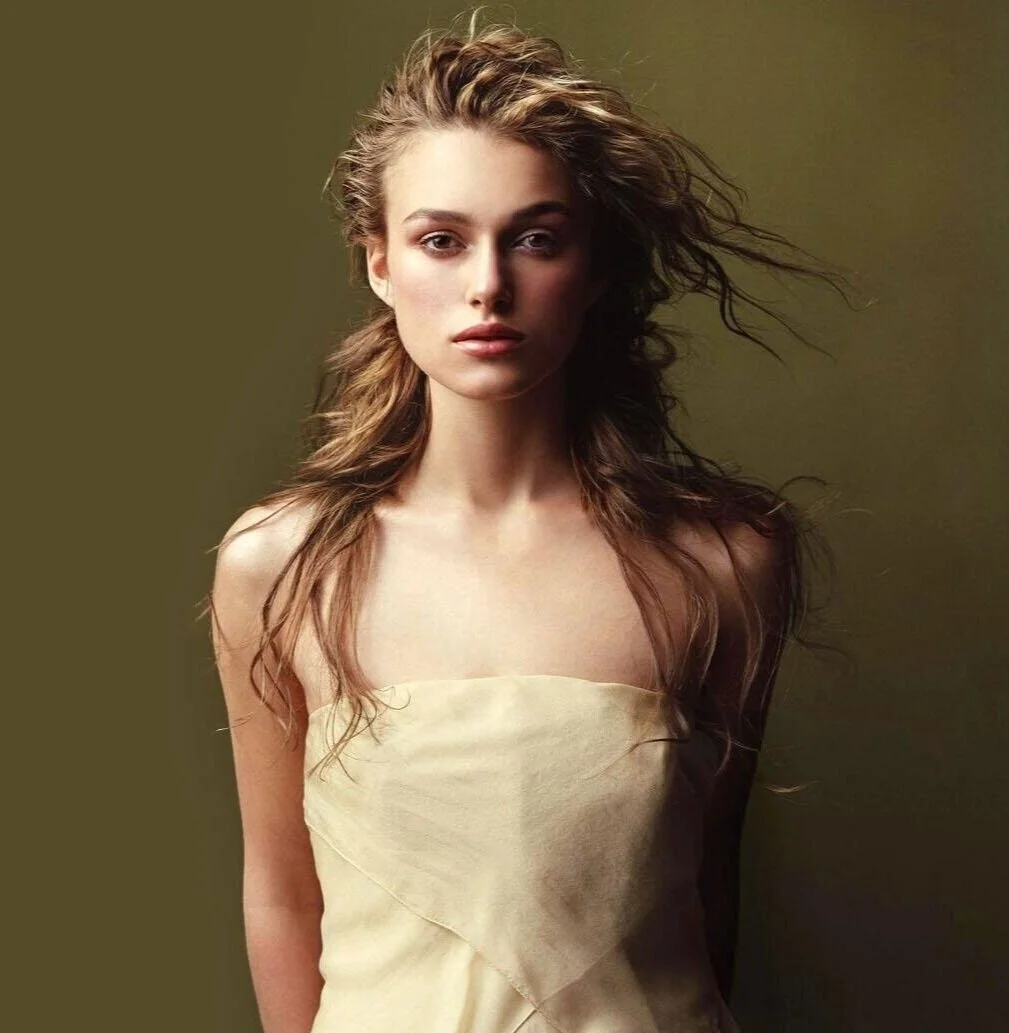
I should pause here and point out that we’re now looking at our third incentive for using LIGHT differentials.
Earlier we discussed using LIGHT for sentimentality, and then we discussed using LIGHT for emphasis, but here we’re using it to sculpt the models features (or to alter the apparent shape of our subject).
So it cant be stressed enough…we want light differentials in our scenes. They’re useful to us for dozens, if not hundreds, of reasons.
But once again, these images are not PARTICULARLY sophisticated, because we’re only using one single variable (Light). And even then we’re only using one single light source.
However, even if stop right here, you’ll probably agree that these photographers are “higher earners” than the previous ones.
But let’s up the ante again.
Instead of using a single light source in the vacuum of a studio, let’s bring that lighting unit on location, and then blend it with the existing ambient light of the scene, so that now our images can look like this:
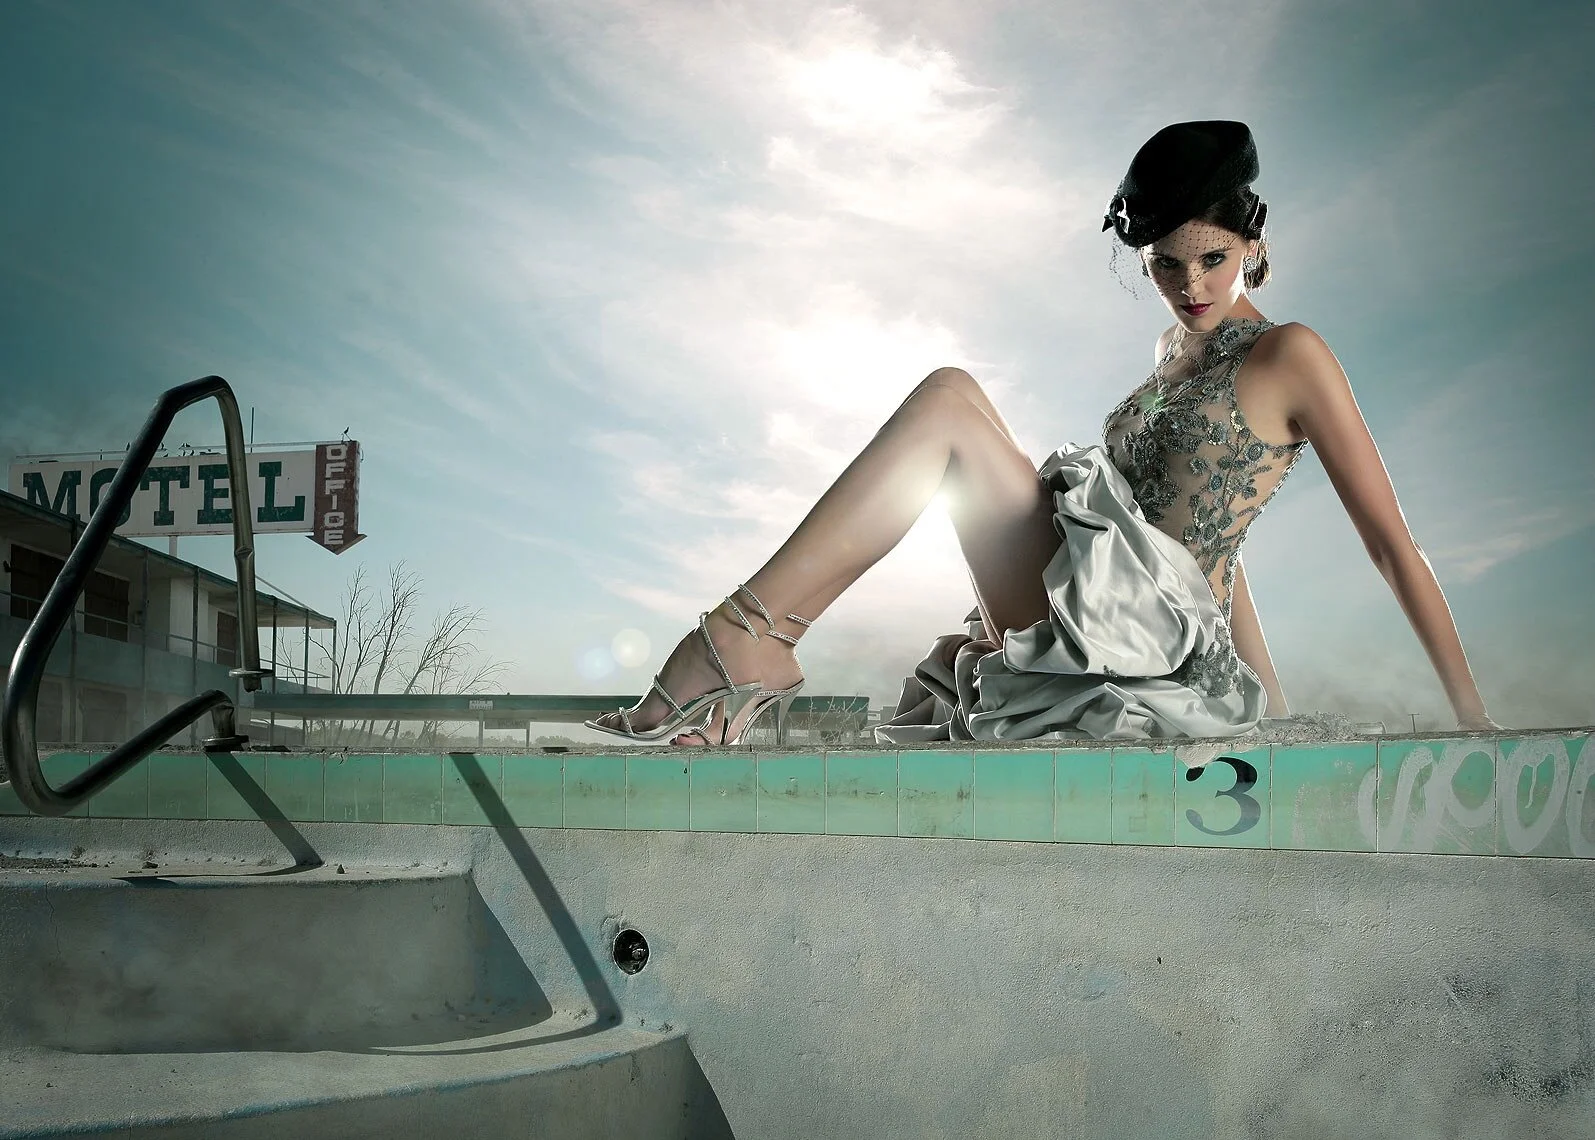
Now we’re getting into images that look more like “high fashion” or images that look more “cinematic.”
And again, the general public often can’t put their finger on what makes these look different.
They perhaps think it’s a lot of post-processing or something. But in reality, the “artificial look” of these images comes from the fact that the light in the scene isn’t behaving like it naturally should. For instance, in that first image (the one taken poolside), the model is clearly backlit by the sun…so waaaay deep down in our subconscious we know she should be silhouetted….and the fact that she’s NOT silhouetted is messing with our perceptions.
But it isn’t Photoshop that achieves that effect. It’s the artificial lighting.
And in fact, just to show how simple this is, here are some of my own students using this same technique:
I have tons of student examples like this. And none of these students came to ASOP knowing how to do this, in fact most of them didn’t even know they wanted these skills.
They just saw how easy it is to do this once you have a full understanding of the underlying logic of photography (and not just an understanding of your “technology”).
And they starting taking these kinds of images “just for fun.”
I’m not kidding.
And I mention this less to brag about the curriculum, or even to brag about my past students…I mention this more to encourage everyone in this class to know that ANYONE can do this. This isn’t difficult at all.
One of the biggest inhibitors of student development is the fact that students often think they aren’t “talented” enough or “technically-minded” enough to be able to do these things.
But across the board, I’ve found that as long as a student adheres to the approach we’re discussing here today, and they take it one step at a time (building one concept on top of the last, until they gradually begin to combine concepts) then yes, absolutely… anyone can do this.
But on the flip side, I’ve found it equally true that if students chalk all of this up to some kind of special personality type - that you have to either be “creative,” or “talented,” or “mechanically inclined” to be able to do this - then they tend to sabotage themselves before they even get going.
Ok, so let’s pause now and summarize all of what’s been discussed so far.
Why did we begin this class with these specific comparisons?
1) This was meant to get you acclimated to some of the ideas and vocabulary we’re going to be using throughout this curriculum. Terms like “light differentials,” or “space differentials,” etc. Gradually, all of those terms will become super routine and familiar to you.
2) This was also meant to reinforce that we are NOT going to avoid and/or hide from the properties of photography. We are NOT going to “dumb down our scene” simply so that we can use the programmed functions that Canon/Sony/Nikon have engineered into our cameras.
We’re going to learn how to seek out photographic variables and then we’re going to learn how to USE them.
So we’re talking about images like this:
Instead of this:
Or images ike this:

Instead of this:
Images ike this:
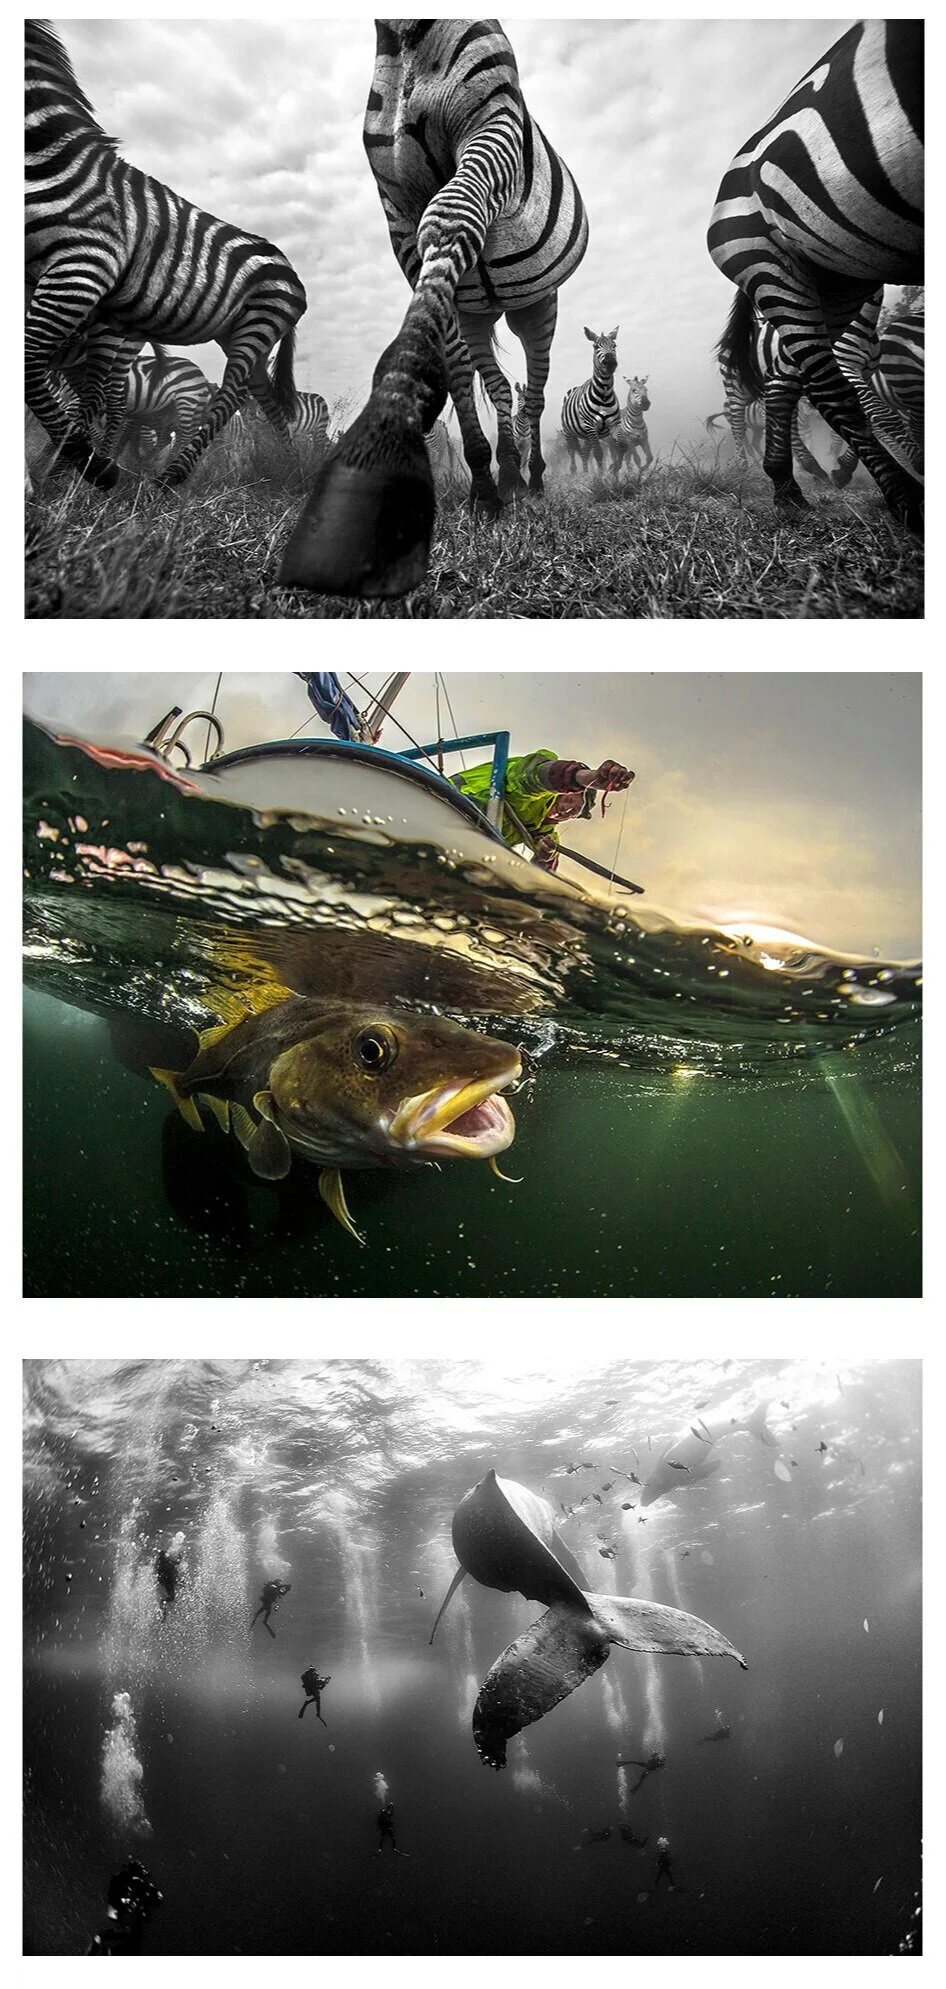
Instead of this:
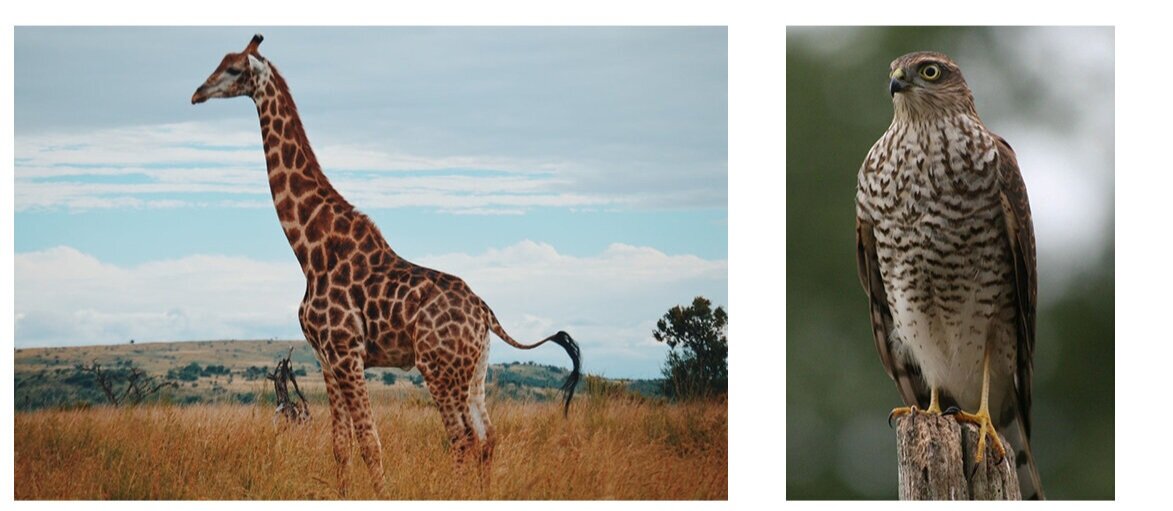
In each of these comparisons, one set of photographers has consciously looked for layers of space, light differentials, and movement…and the other set of photographers has learned to avoid them entirely.
And if you can see that, it means you’re now fully acclimated to this distinction.
Which was the entire point of this discussion.
[And sidenote, once you see it, you’ll never be able to UNSEE this distinction]
However, one other note here.
I need to say that if you do genuinely prefer the more simplistic images illustrated above, that’s fine too (really it is). We won’t judge anyone’s preference for images.
What we WILL do is heavily discourage using inefficient and faulty methodology in order to achieve those images.
In other words, if you learn photography as those photographers above did, through your camera’s features and algorithms, then you’ve put a very defined ceiling on what you can and can’t do as a photographer, which means you won’t be very adaptive, or very skilled at problem-solving.
So while photographers who learn what we’re learning can shoot EITHER way, the photographers who learn this medium exclusively through their camera’s interface will invariable become trapped within a limited set of knowledge and abilities.
Most of them only know how to shoot one way.
So in short, if you do prefer those more simplistic images, we’re going to make sure you have CHOSEN to shoot that way, and not that you’re shooting that way BY DEFAULT….because you didn’t know any other way to shoot.
Finally, I just want to reiterate once again what I said at the top. I know that at least half of you aren’t interested in “professional photography.” And that’s waaaaay more than fine. We will have TONS of discussions going forward regarding fine art photography, hobbyist photography, and documentary photography, etc.
Again, the reason I began this session with a look inside commercial photography is because commercial images tend to be much more familiar to the average person than, say, contemporary fine art photographs.
But having said that, the real truth here is that the wildly divergent interests of my students is maybe the single best asset of this program.
It actually benefits this school in a number of tangible ways, which is why I’m always hoping we have a wide variety of interests in here.
See, one complaint I tend to have with traditional photography education is that, from the very beginning of the learning cycle, students are often segregated into little homogenous groups, based on either the gear they want to use, or the subject matter they want to shoot.
So in the case of photography ‘workshops,’ you often get a lot of specific titles like “how to shoot wildlife,” or “how to use speedlite flashes.”
And the thing is, when you frame a learning experience in that way, you’re always going to end up with a pretty narrow demographic.
And on the other end of the spectrum, in the case of college programs (and I myself hold a degree in photography), students who have even slightly different interests are encouraged to attend entirely different institutions.
For instance, someone who wants to shoot “fine art” photography might be told to attend the Rhode Island School of Design or the Art Institute of Chicago.
Someone who wants to shoot “photojournalism” might be told to attend a large “state” school such as the University of Texas or Western Kentucky University.
Someone who wants to shoot “fashion photography” might be advised to attend FIT in New York City.
And then, once those students have been segregated into those little homogeneous groups - with no exposure whatsoever to any other demographic - they are then taught the one prevailing methodology associated with that one particular subject matter.
Which means whether you’re attending a full-fledged university program, or just a professional workshop, most photo education tends to START with an “endgame,” a very specific application, or a very specific subject matter, and then work backward from there… reverse-engineering one specific process.
And having been taught that way myself, I can say that it’s a TERRIBLE way to learn. Students learn only one particular methodology, or worse, they learn to mimic a specific set of “tricks.”
Basically it produces students who have some moderate grasp of the “surface-level” issues in photography, but almost no grasp at all for the underlying issues that connect all of these forms of photography.
This is why I regularly meet degree-holding photographers who know less about this medium than my own Photo1 students. Most of them just can’t seem to connect the underlying dots about photography, because they’ve learned only a very narrow wedge of what this medium can do.
Which means they often can’t adapt very well to other styles of photography, or to other photographic tasks.
In other words, fashion photographers often don’t know anything about photojournalism….and fine art photographers often don’t know anything about architectural photography.
But ASOP graduates can handle any and all of those photographic tasks.
Because our view is that, whether someone wants to shoot fine art photography, photojournalism, commercial photography, or just simply take more sentimental pictures of their own children…everyone needs to learn the same fundamental things.
The truth is, all those different types of images are made up of the exact same principles (the same Light, Space, and Time variables we discussed above).
They all share 97% the same DNA.
The only real difference is the exact subject matter you happen to be shooting, or the particular audience you’re aiming for.
So to be clear, at ASOP, we’re not starting with the endgame - ie: we’re not starting with one particular subject matter, and then reverse-engineering one or two ways of shooting it.
Our students learn photography comprehensively….and from the ground up. And that way, when we get to the end of the curriculum, they’re able to shoot in any style they want, and with any gear they want.
That’s total photographic fluency.
And that’s what we’re aiming for.
But finally, one last general thing I want to discuss in the “orientation” section of today’s lesson, before we finally move on to some more practical and more specific information.
I want to talk a little bit about YOUR CAMERA
I also want to establish why it’s so important to shoot manually, and with full direct control over the image…as opposed to using the more hyped up programmed “features” of your modern camera.
And in discussing this, I need to prepare you for what may come as an unexpected twist:
Your own camera is going to be the single biggest obstacle to your learning photography.
I wish I were kidding, but it’s absolutely true.
How can that be the case?
Well it’s an indirect consequence of all the different camera companies competing with each other so aggressively.
To understand what I mean by all that, the analogy I like to use is “learning to drive a car:”
As it stands now, if you learn to drive in a Honda Civic, you shouldn’t have any problems driving a Toyota Corolla, or a Volkswagon Jetta…. should the need ever arise.
And although we all have our particular preferences as to which car we want to own, when we arrive at a crowded airport car rental counter on a very busy holiday weekend, we’ll take whatever car is available, and be grateful to have it. Because, at the end of the day, despite our own quirks and preferences, driving any of those cars is FUNDAMENTALLY the same.
But now imagine a world in which Toyota and Honda have figured out that they can keep their customers more brand-loyal if they design their cars to be as different from each other as possible.
So whereas our current cars all have an accelerator on the right and a brake pedal on the left, in this alternate reality, Honda decides to put their brake pedal on the right, and their accelerator on the left. Toyota decides to ditch the traditional steering wheel and install some sort of “smart joy stick” for steering.
The advantage to this strategy is that it would coerce drivers into sticking with the same brand of car, probably for life, because absolutely no one would want to have to re-establish an entirely new muscle memory for driving. Which means that, in that world, when a person arrived at a busy airport rental counter, they would be totally adamant that they have to have a Toyota, because they wouldn’t even know how to drive a Honda.
But the thing about the automobile industry is that it’s regulated for safety reasons. So Honda and Toyota CAN’T do that. Their cars have to be built to certain codes and standards.
But Canon and Nikon are not beholden to any such standards.
They can do anything they want. And they’ve figured out that engineering a lot of unnecessary differences into their cameras keeps customers a lot more brand-loyal. Which means a good portion of the illogical and counter-intuitive clutter that’s been added to our operating systems wasn’t put there for good reason (because it might IMPROVE your photography), it was put there simply because it was the opposite of what the other companies were doing.
And this will drive all of us insane throughout this course.
A lot of very universal ideas about photography (and frankly, a lot of very SIMPLE ideas) are going to seem more complicated than they are because of the way these camera companies have intentionally divided you. And that means we’ll have to spend a lot of time figuring out why one person’s camera is behaving different than another’s.
And when that happens, when we all get frustrated, I need you to assign that blame where it belongs:
That isn’t PHOTOGRAPHY’S fault.
That’s Nikon’s fault….
That’s Sony’s fault….
That’s Canon’s fault.
You can imagine that a lot of students will conflate and confuse their frustration with the camera technology as a frustration about PHOTOGRAPHY.
And then some of them might even think, “Ugh, maybe photography isn’t quite for me.”
Which is tragic….and infuriating.
As an instructor, I find it unforgivable that these companies are influencing who finds joy in this medium, and who doesn’t, simply because their marketing departments have run amok.
So the takeaway here is that photography itself is a lot more simple than you might think…but your camera can be infuriating.
And I just want you to disentangle those two things as much as possible, because it’s very easy to conflate them.
I also want to make sure you’re mentally prepared for how much your camera is going to get in the way of the learning process. It will happen a lot. In fact, it will happen later on in this very lesson.
I want to make sure that you aren’t blindsided by it.
Or made cynical by it.
I want you to be expecting it.
But the good news is that it’s really just for these first few weeks. Once we’ve ironed out the wrinkles, and learned to work around the various paternalistic features and marketing gimmicks on each of your cameras, you’ll hardly notice any of it all. But I won’t lie to you….Canon/Sony/Nikon will make these first few weeks pretty rough.
And so I just want to reiterate one more time, when we encounter that roughness, it’s not your fault, and it’s not photography’s fault….It’s Sony’s fault.
But the other thing I wanted to address about your camera (in terms of themes and generalities) is the distinction between shooting manually as opposed to shooting with automatic algorithms.
When I ask students on this first day of class, “what’s the difference between shooting manually as opposed to shooting with automatic functions?” I get a variety of answers, but the consensus seems to center around the idea that manual photography gives you more control, but is maybe more complicated, and more time-consuming. Whereas shooting on AUTO is much faster and more simple…. but means you might have some misfires, or might have less overall control over the results.
But that sentiment isn’t QUITE accurate.
Yes manual photography gives you more control over the image. That part is very easy to demonstrate.
But what may come as a surprise here is that manual is also faster…and far less complicated.
How is that possible?
Well it’s all a bit too much to explain here on this first day of class, but here’s the gist:
One of the things people often like to say about automatic photography is that “the CAMERA takes the picture for you.”
But that’s not even close to true.
The problem with any form of automatic photography, whether it’s FULLY automatic, or even just “partially” automatic, is that your camera has no sentient, artificial intelligence. Instead it operates based entirely on “algorithms,” a set of pre-programmed responses that have been hardwired into your camera’s software.
And that means when you shoot on any form of automatic, there is a HUMAN BEING responsible for the outcome of your picture. It just isn’t you.
So who’s responsible for the outcome of your picture when you shoot in automatic?
The engineers who wrote the algorithms, of course.
In other words, when they’re programming their cameras at Canon/Nikon/Sony, they do a ton of market research on what the average consumer PROBABLY wants in their shooting - ie: the kinds of choices a layperson makes when they’re shooting friends and loved ones at birthdays, and weddings, and on vacation.
And what does their research tell them?
Well, I’m sure you could probably guess. For instance:
What’s the subject matter for most photos?
A person, or people.
How do most photographers FRAME that person?
Directly in the center of the frame.
How far are they from their subject?
About 4-6 feet away.
Etc. Etc.
Again, these are the decisions most people make when they’re shooting their friends and families.
So the engineers tend to program the camera’s responses with a lot of those basic assumptions in mind.
But then if your own shooting at all strays from those expectations (i.e.: if you want to structure your shot in some of the more sophisticated ways we discussed earlier…or really in any different way at all), then those core program functions tend to get really confused, and malfunction, and give you unexpected results.
But the even more ridiculous thing is that, even if YOU DO compose your shot the way those engineers expected, those functions will still be thrown off by any small variable in your scene.
So, for instance, if you compose a person in the dead center of your frame, 5 feet away from you (as Nikon expected you to)…BUT, there is a window directly behind them that’s letting a lot of bright sunlight into your lens…then in that instance, I can almost guarantee your camera is going to misfire, and probably silhouette your subject.
One simple variable in your frame….and the algorithm fails.
And again, that’s even when you DID compose the shot the way the engineers expected.
In other words, even if you adhere to the basic formula the camera companies were expecting you to use, your algorithms will still fail a significant percentage of the time.
But this gets infinitely worse when you try to do anything different or unexpected.
At that point your algorithms will fail nearly 100% of the time.
So in order to combat this, the engineers tack on even more algorithms, giving you a bunch of extra functions that are meant to correct the camera’s behavior in very specific circumstances.
Basically a whole lot of “override” functions.
In fact, you might have heard of some of these functions before. They’re things like “Aperture Priority Mode,” which allows you to override the aperture, or “Exposure Compensation,” or alternative “Metering Modes,” or “Exposure Lock,” etc.
These all sound fancy and intimidating to beginners (and indeed, most “professional” workshops are built around learning these kinds of features), but the truth is, these are all just functions that were designed to let you FIGHT with the original, base-level programming of your camera…as opposed to just sidestepping the camera’s programming altogether and shooting the image more directly, and with your own independent knowledge.
And what will become very clear by the end of this course is that “fighting” with your camera is not only MUCH slower and more tedious, but it also forces you to take simpler pictures.
So believe it or not, as surprising as this may sound, the first advantage to shooting manually is that it’s a lot faster, and a lot less of a headache.
It’s just that it takes a couple of months to learn how to do it.
And as surprising as this is going to sound…most photographers just aren’t willing to do that. Even most professionals. They’d rather learn the “features” of their camera in just a few weeks, and then spend the rest of their lives constantly fighting with their camera.
But that said….while being able to shoot faster and more efficiently are both excellent incentives for learning manual photography, they aren’t the BEST incentive.
The best incentive for shooting manually is that it allows you to have much more control over the image, and better develops your vision….which, in turn, allows you to communicate more complex ideas within your photographs.
To understand why this is the case, let’s go ahead and look at this set of examples drawn from a class exercise here at ASOP:
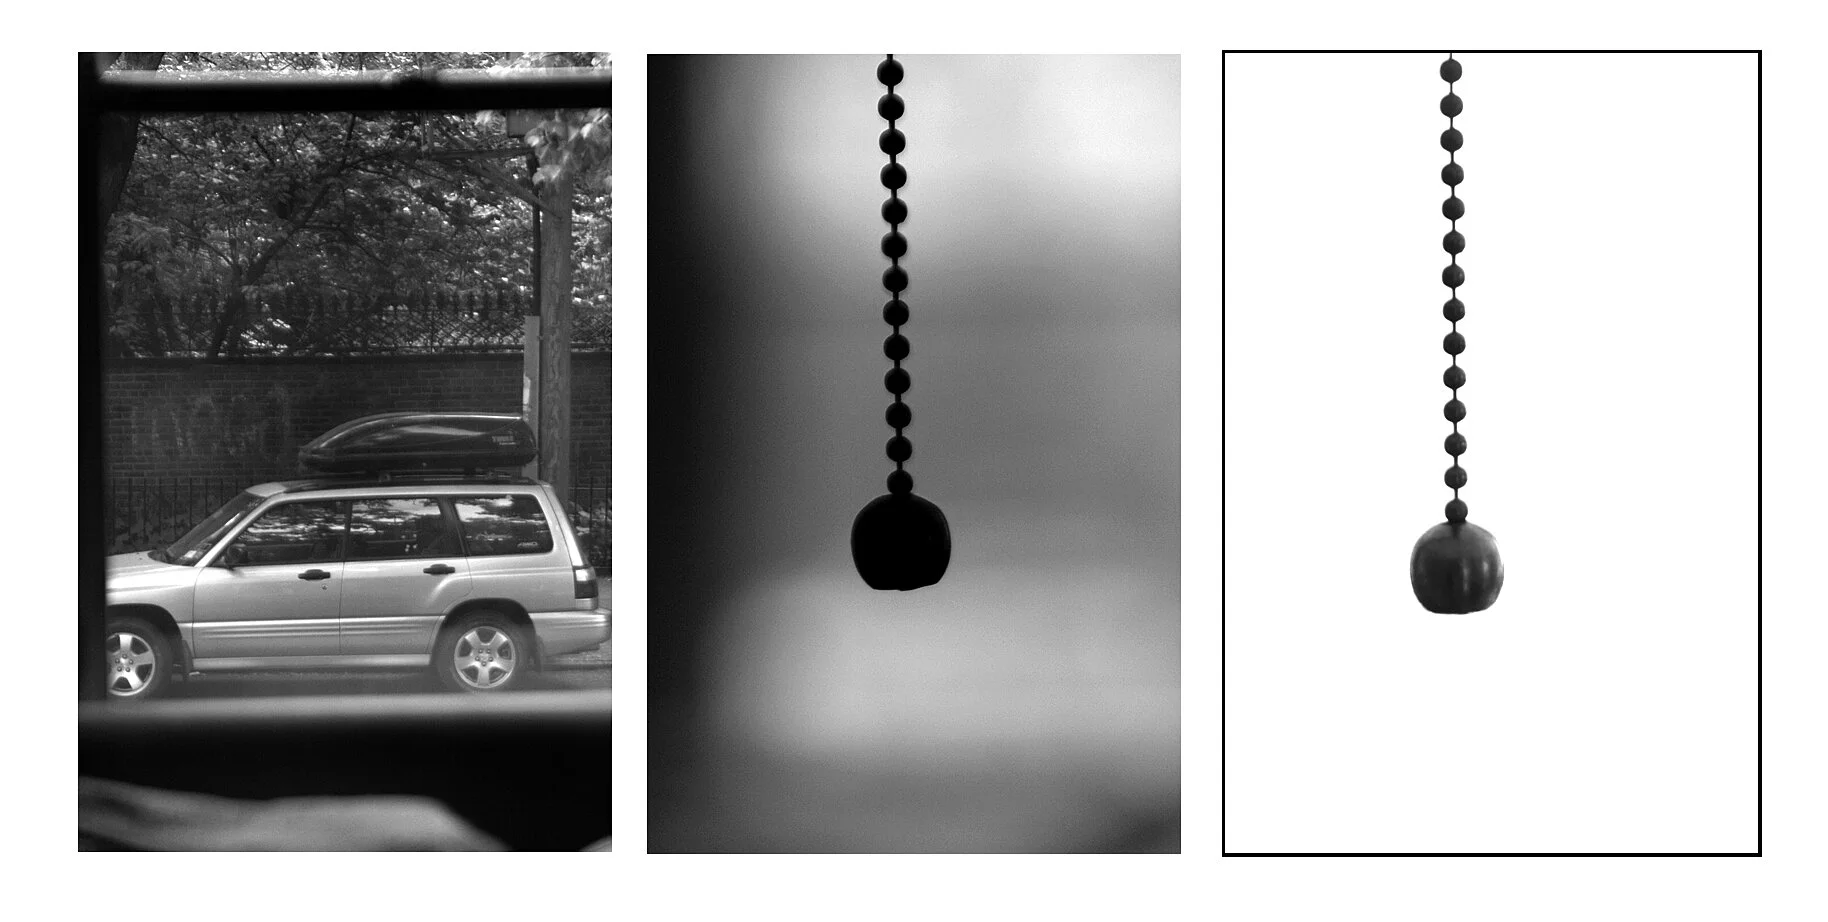
I want to preface this by saying that these images are not meant to have “interesting” subject matter. In fact, as a side note, I found out pretty early as a teacher that if I use intriguing subject matter to make a TECHNICAL point, then the subject matter often just distracts students.
So instead, what we’re looking at here is a lamp chain that’s hanging in front of a window.
The important thing to know here is that all of these images were composed IDENTICALLY.
In other words, it’s the exact same scene, and it’s even the exact same FRAMING. We’ve just changed the way we’ve manipulated the physics of the scene.
How can that be?
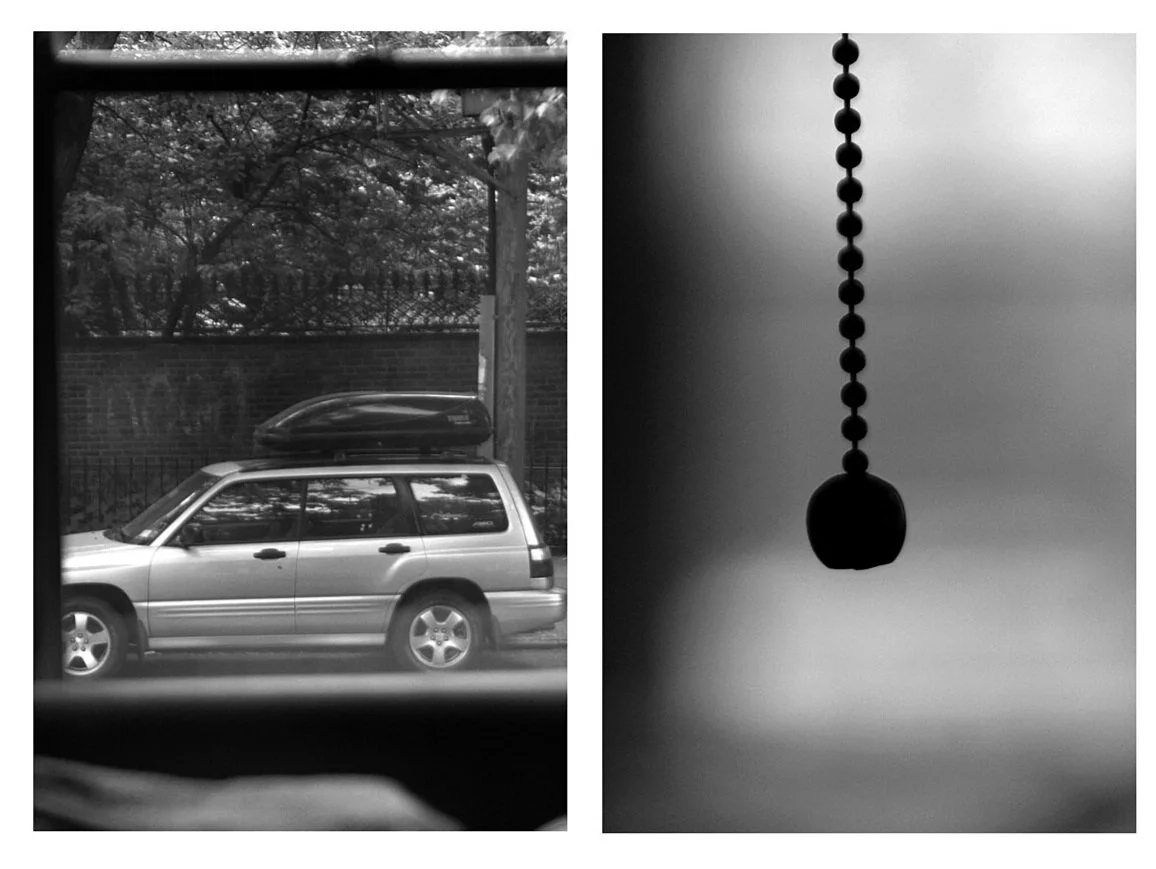
Well, If you look at these two images here, you can see they’re framed the same way, we’ve just altered our “exposure,” ie: we’ve altered the amount of light we’ve let into the camera (in order to make the image brighter or darker):
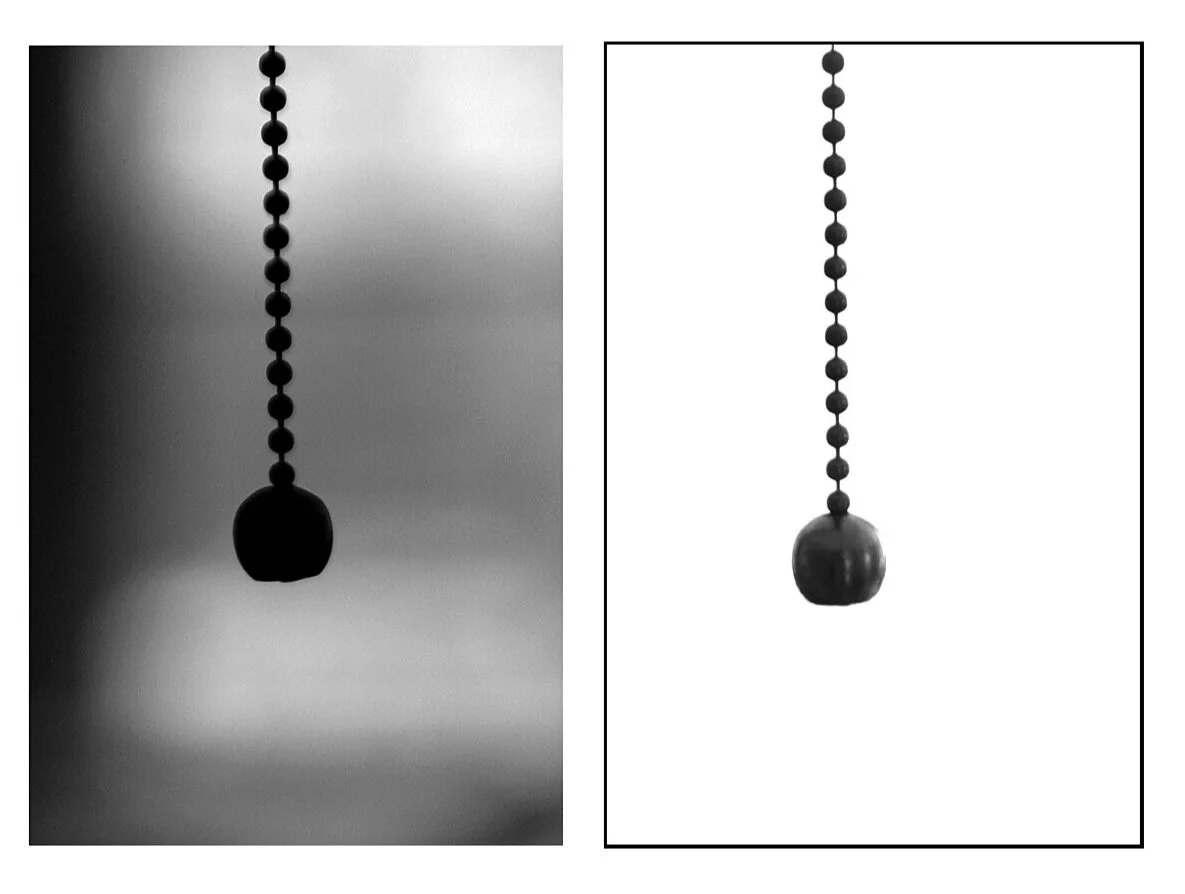
But what’s probably a little less obvious is the fact that these two images here were EXPOSED the same way (look at the similar shades of gray), we’ve just swapped the focus from background to foreground:
And so because each of these pairs of images have had only ONE alteration made to them (either the focus has been changed OR the exposure has been changed…but not both), it’s easy to see the connection between them.
In other words, in each of these first two comparisons, it’s easy to see that both images came from the same set-up, because they don’t look ENTIRELY different.
But now look at these two images here:
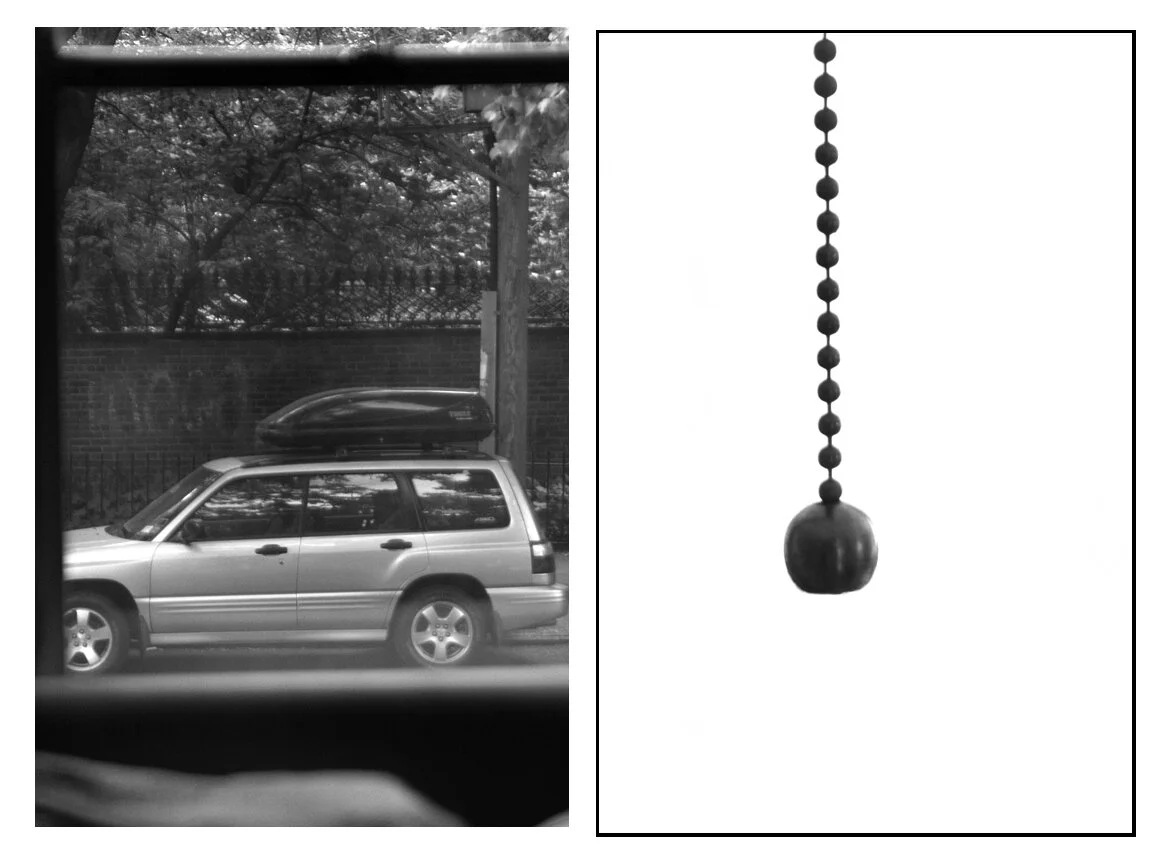
These two images seemingly have nothing in common.
In fact, if I had only shown you these two images to begin with, you’d probably never have believed that they were the same shot.
But they ARE the same shot, and they’re even framed in the exact same way.
But the reason we can’t see any connection between them is because MULTIPLE alterations have been made (in this case both the focus AND the exposure have been altered).
In short, we’ve acted on MULTIPLE variables. We’ve COMBINED our use of variables.
So there are two things I want everyone to take from this demonstration.
First, when we talk about composition at ASOP, I need to make sure that you realize that this is what we’ll mean. Composition isn’t just how something is FRAMED. “Composition” is also the sum total of all of the techniques you’ve used.
Having an eye doesn’t mean that you’re simply good at framing a shot in a pleasing way, it means that when you look through your lens, despite whatever your anatomical vision sees, you can see ALL of these possibilities. You can see what an image CAN be, not just what your eyes literally see when you look through the viewfinder.
In other words, you should be able to look through your viewfinder and see BOTH of these possibilities:
When we discuss having an eye,” THIS is what we’ll mean.
THIS is “photographic vision,” and it’s the kind of vision I expect from my students.
Which is why you need to know how all of these various techniques work very “directly,” rather than through the abstraction of your camera’s “features” and interface. In fact, your camera’s “features” and algorithms usually can’t handle more than one variable at the same time, which is why I’ve never seen an “automatic” photographer acquire this kind of vision.
But second, and waaaaay more importantly, this demonstration also highlights how important it is to COMBINE differentials.
When we were looking at those Wedding photographs earlier, you might have thought that the reason I was so adamant about COMBINING differentials was because it makes the image more “dramatic,” or more “awesome.” But that’s not at all the case at all.
The real reason we want to align MULTIPLE differentials in your shot is because it gives you more choices for how to structure you images.
The idea here is that if you have NO VARIABLES, you can’t do anything to alter the shot.
If you have ONE VARIABLE, you can alter your shot a little bit (and you might have something like 2 or 3 options for how to do so).
But if you have MULTIPLE VARIABLES…you can radically restructure your shot (and you might have 10-20 different options for how to do so).
So the bottom line here is that you can’t radically restructure your shot unless you have more than one variable to work with.
So with that in mind, think back on those very first wedding photographs we looked at.
Their images weren’t just “simple.”
More importantly, those scenes offered the photographer no creative choices.
And because there were no creative technical choices to consider, there was really only ONE RATIONAL WAY to structure those pictures.
Which, remember, isn’t by accident.
Composing an image with no differentials in it (so that there is only ONE RATIONAL WAY to take the picture) makes it easier for your algorithms to figure out what to do. So these photographers have been specifically taught to select a scene that has no creative choices, a scene that can only be shot ONE WAY.
Because if you DO compose scene or a shot that would allow for MULTIPLE ways of shooting it (like the “lamp chain” image above), then the camera would have to be able to read your mind in order for it to know what you want to do with the shot….and we are a long, long way off from having artificial intelligence that can do that.
So the way this curriculum is going to work is that you’re going to 1) learn the value of every individual photographic variable.
Then you’re going to 2) learn the value of COMBINING multiple variables within the same shot, so that you know how many options you have to radically re-structure your images.
And then 3) once you’ve developed that muscle memory, that set of priorities, and that ability re-structure your shots on command….THEN you can unleash that ability onto the subject matter you want to shoot.
So let’s go ahead see what it looks like when students begin applying this methodology to a more interesting subject matter.
This is an exercise in which students have to FIRST align the scene so that there are no substantial variables in their shots, and then, SECOND, they have to re-align the same scene so that there are several substantial variables to work with.
So first, here we have a basic snapshot of a cheap, miniature U.S. flag, purchased from the impulse aisle at the local supermarket (in other words, the absolutely least someone can do to express her patriotism on July 4th):

And here we have an archetypal depiction of “Old Glory” guiding us through dark times.

In this second shot, the student has used a lens that separates the flag from the background, making it look much taller (in other words, it’s utilizing a SPATIAL differential)….and then they’ve also used a LIGHT differential in order to give it a more glowing, iconic look.
It’s the exact same flag.
One shot was taken by eliminating differentials.
The other shot was taken by USING differentials.
Furthermore, it also needs to be noted that the first shot merely SHOWS us the flag, or “points out” the flag to us…. whereas that second shot communicates the flag in a specific sentiment, or a specific archetype.
So is it the SUBJECT of a photograph that does most of the communicating?
Nope.
The subject of a photograph never speaks for itself. There are a million ways you can shoot the exact same subject.
It is the STRUCTURE of the photograph that does most of the communicating.
Thus, our job is not to “find the best subject matter.”
Our job — whatever the subject matter — is to CONVEY that subject matter in the exact way that we want.
But let’s do this one more time, but now in reverse.
This first image shows South Congress Avenue here in Austin as a very busy and chaotic scene:
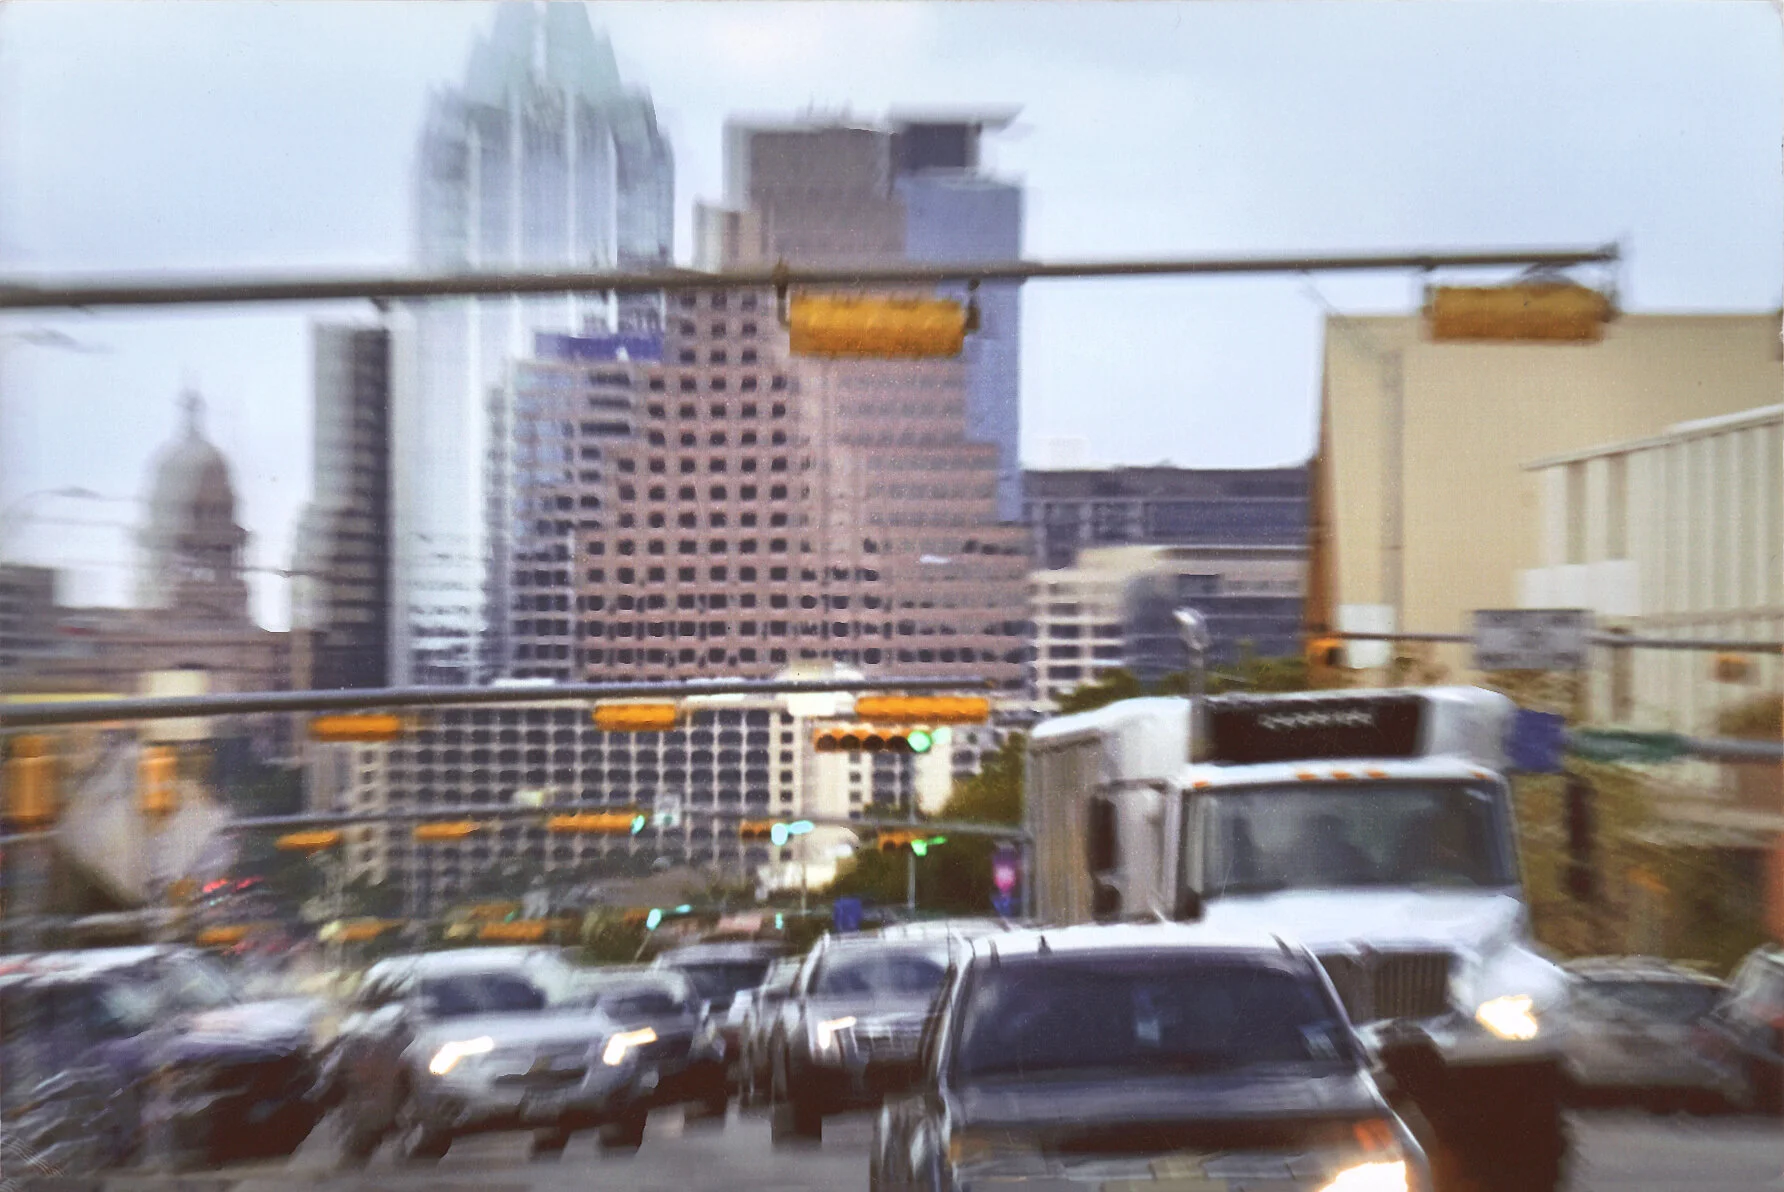
Or….maybe it wasn’t:
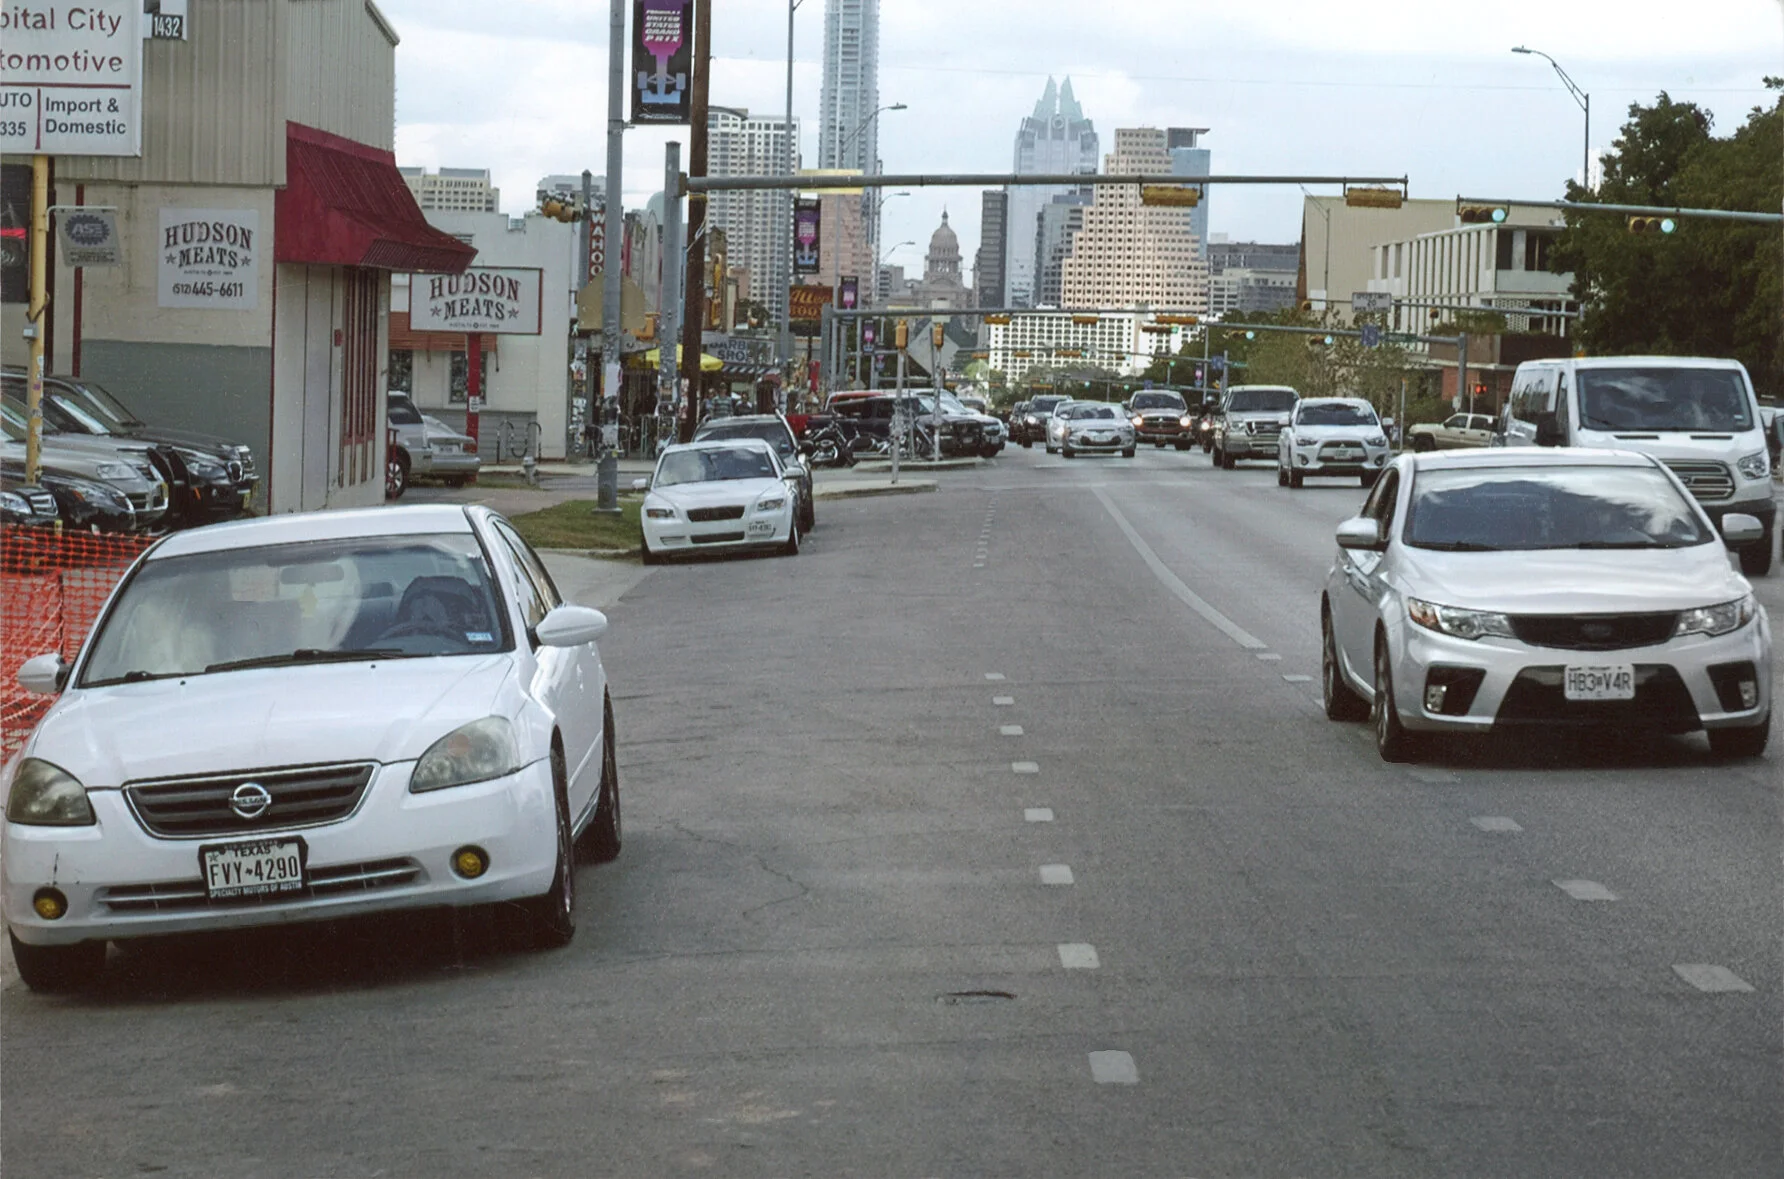
Once again that’s the exact same scene.
And once again, this student has simply RE-STRUCTURED the image.
This time, for that first shot, they’ve used a specific kind of lens that COMPRESSES everything in the scene (ie: they’ve used a Spatial effect), making the intersection seem more crowded and congested than it really was. And then they’ve combined that effect with a “shaky” slow shutter speed (ie: a Time variable) to make it seem more like things are moving.
In other words, the mechanics of communication are as follows: we are being shown an image structure that connotes “chaos” whenever it’s applied to ANY subject (if you shot a bowl of bananas like this, it would seem like an “exciting and chaotic” bowl of bananas). But this student has chosen to apply that structure specifically to South Congress Avenue, so that the viewers of the image will now associate South Congress as being “exciting and chaotic.”
That’s how photographic communication works.
Once again, the subject never speaks for itself - the STRUCTURE of the image does all of the communicating.
For any given subject, there are a million ways the viewer can interpret or perceive that subject.
Photographic communication is about NARROWING down how the viewer will perceive that subject.
And the way you do that is by re-structuring your image.
So again, we don’t want to begin our photographic education by thinking about “what subject is best to shoot,” we want to begin our photographic education by learning how to re-structure an image.
Or…..to summarize this ENTIRE train of thought:
1) In order to communicate a specific idea with an image, you have to be able to re-structure your shot so as to EXPRESS your subject in a very specific way..…
2) But in order to really be able to re-structure your shot, you have to align multiple variables in front of your camera..…
3) In order to be able to handle multiple variables within the same shot, YOU HAVE TO BE SHOOTING MANUALLY.
That’s the main take-away from all of this.
Which brings us back to manual photography.
Yes, it’s great that shooting manual is FASTER. That’s your first incentive.
But the much bigger incentive is that, in order to practice a higher form of photography, one in which you COMMUNICATE something more specific (or something more personal) about your subject matter….you have to be shooting manually.
[One more small note I’d like to make along these lines is that, in this course, we’re going to think of photographs in an almost GRAMMATICAL sense. If the subject of your photograph is like the “noun” in your sentence, then the STRUCTURE of your photograph is like a set of adjectives and descriptors that will help narrate and describe your subject].
Ok, so to recap everything we’ve covered so far:
The very first demonstration at the beginning of class highlighted the fact that higher-level photographers embrace differentials and variables rather than hide from them.
That was the very first point I needed to make. That we’re LOOKING for variables to exploit. Not AVOIDING them.
And then this second demonstration was about why you want to shoot manually, and more directly, rather than use all of your camera’s fancy program functions. Because if you use any programmed functions at all, you’re forfeiting a lot of your creative and communicative choices.
So in summary, this first half of today’s lesson has been an introduction as to which aspects of photography you want to learn to PRIORITIZE when you’re first starting out.
Toward the end of this course we’ll finally begin to care about things like “subject matter,” or which of your new-fangled “camera features” might actually be helpful to you….but we won’t BEGIN with any of that.
That’s the key mistake most photography programs are making
—————————————————————————————-
Ok, so for those who are skimming this page in order to review this material, what all did we learn in this orientation, today?
HERE’S A CONCISE SUMMARY:
1) You want variables and differentials in your shot - you don’t want to avoid them - because they are what allow you to narrate, express, or comment upon your subject matter, rather than just “capture” your subject matter.
2) The way you EXPRESS something in photography, or communicate a very specific idea in photography, is by RE-STRUCTURING your images. And in order to do that, you need to align enough variables in your shot that ENABLE you to re-structure your image or “differentiate” your image. And in order to do that, you need to be shooting MANUALLY.
3) The mistake most photographers make when they’re learning this medium is that they almost exclusively concentrate on SUBJECT MATTER (choosing the right subject, choosing the right location, choosing the right pose)….and then they put the rest of their efforts into learning their TECHNOLOGY. And that traps them in a routine wherein they don’t know how to make unique creative decisions, or even how to problem-solve. They stick mostly to a set of formulas that involve using their “camera features”
Those are the main themes of this lesson.
Alright, for “Part II” of this first lesson, we’ll finally stop speaking in generalities, and actually get into some specific facts and details that will get you on the road to understanding these ideas in a far more practical sense.
So let’s now discuss the very basic, essential, manual functions of your camera.